Robotics
Unitree Qmini Robot
BOM
- Unitree GO-M8010-6 关节电机 (不少于10台)
- Unitree GO1 电池
- Unitree USB 转 4 路 485 适配器
- Raspberry Pi 4B 内存 4GB 带 WiFi 及蓝牙或更新版本、或使用 Jetson Orin Nano
- 轮趣 N100 IMU
Qmini 执行器接线
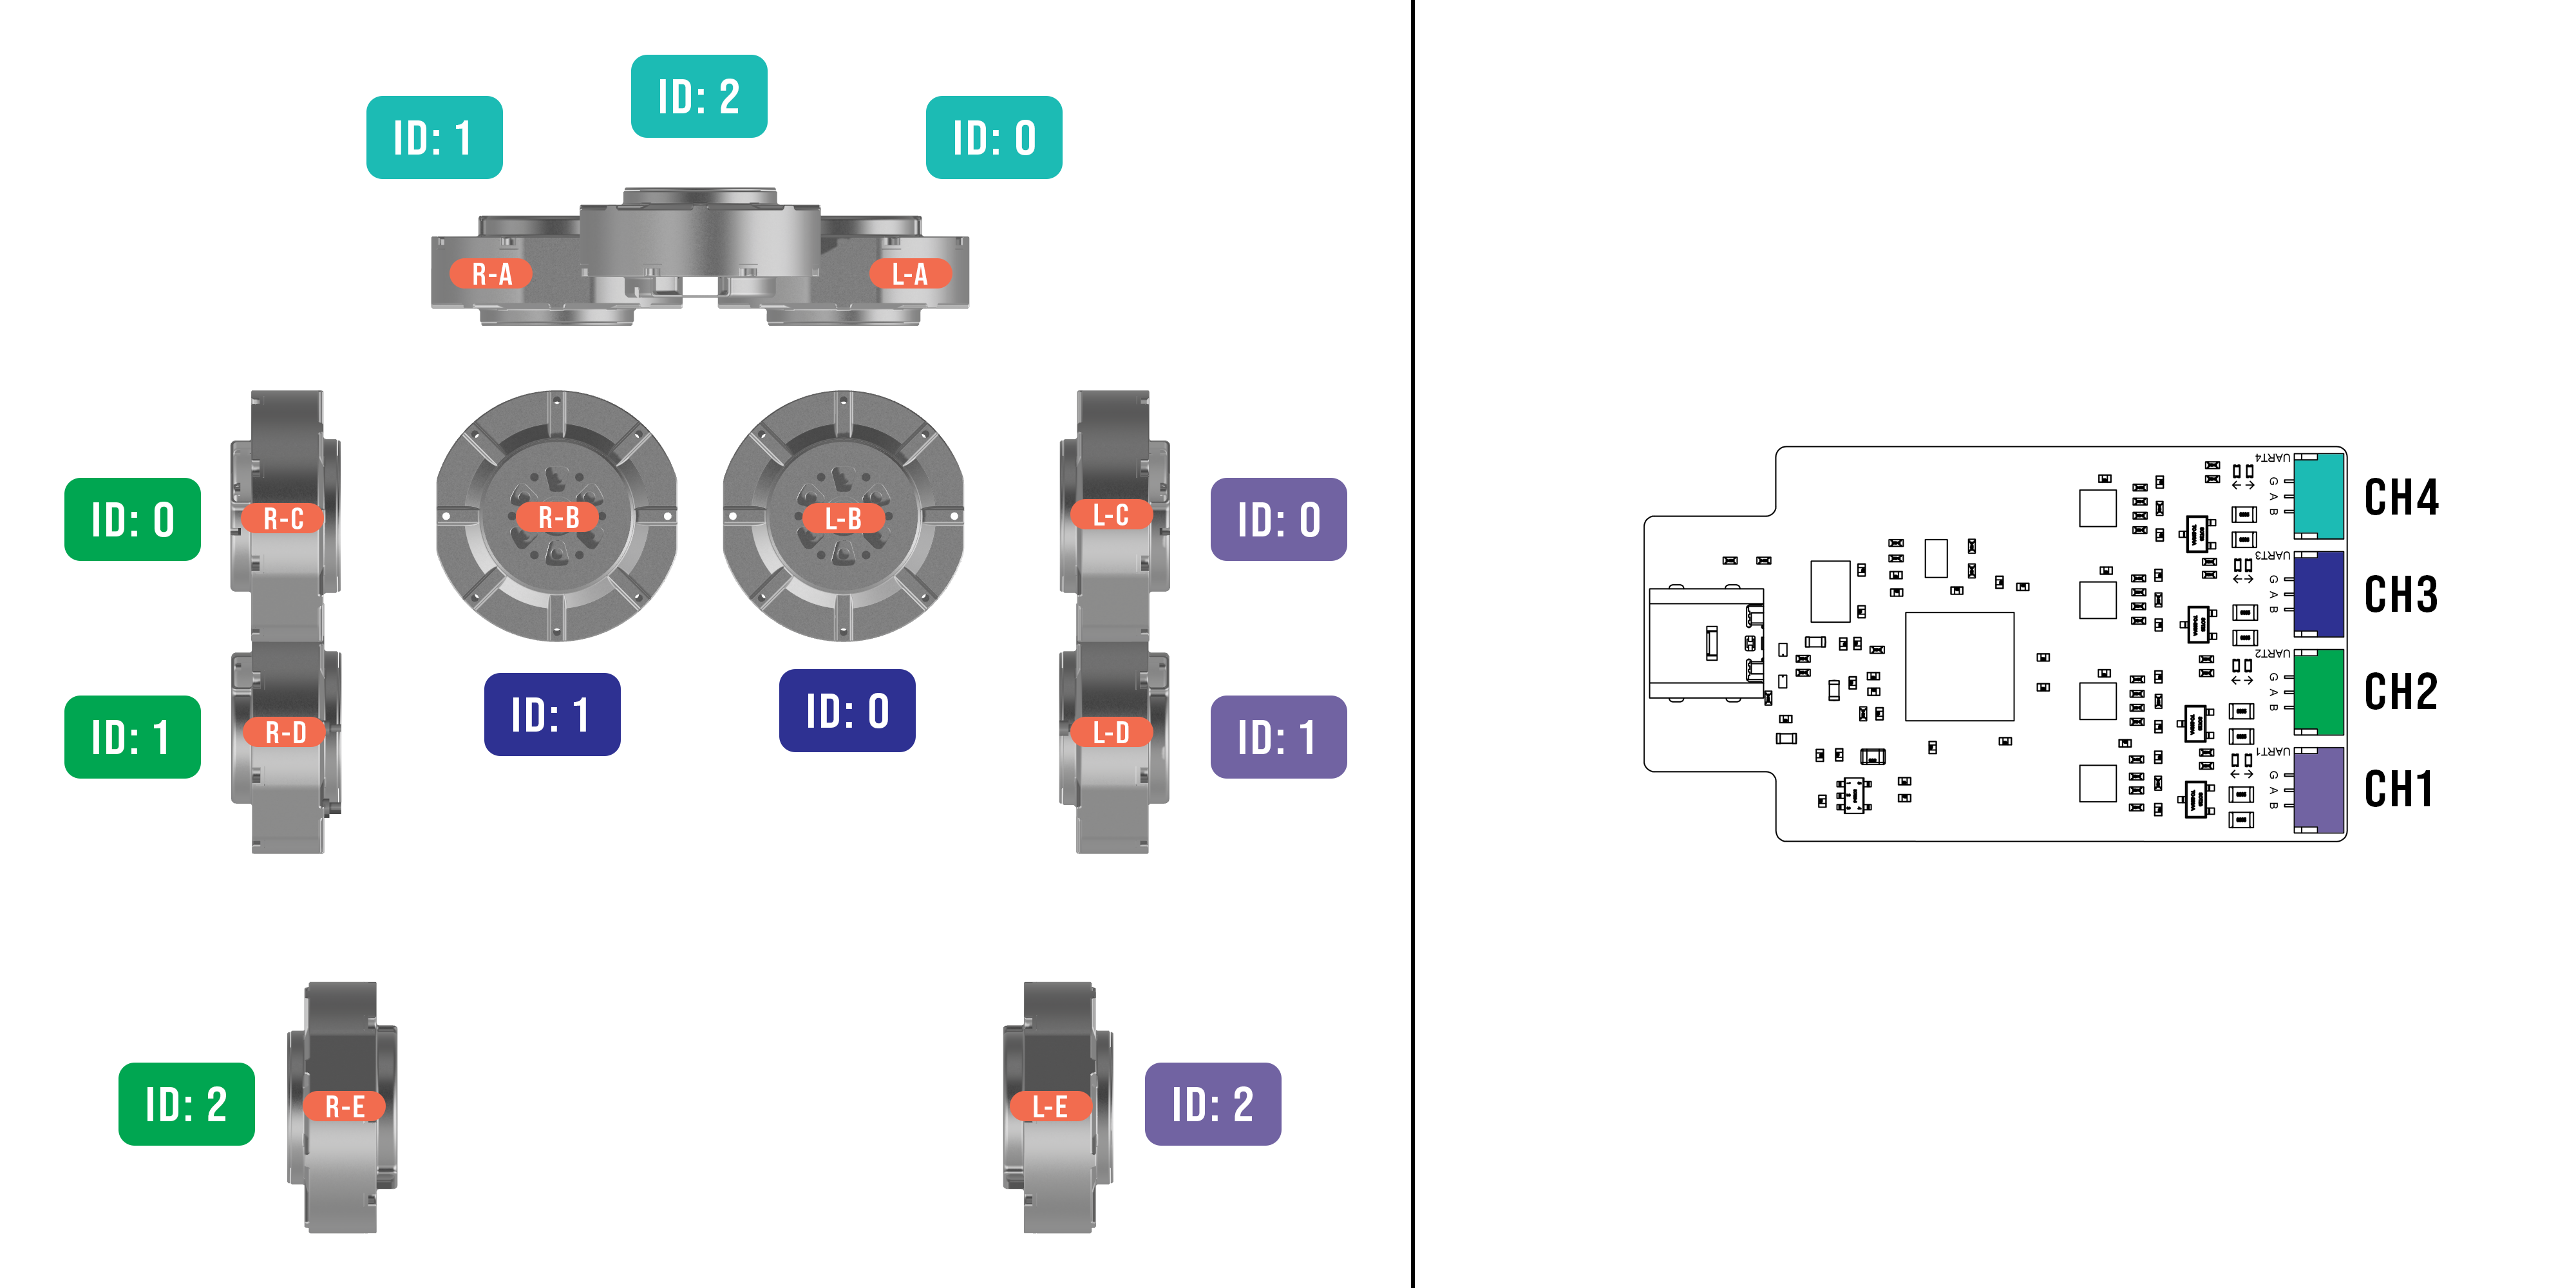
打开 include/user/Motor_thread.hpp 并修改 USB 转四路 485 适配器对应的四个串口 ID,可通过 ls /dev/serial/by-id 查看具体 ID,并将下方代码中******部分替换为真实 ID,注意如果存在多个串口,注意根据命名规律识别。
std::vector<SerialGroup> serialGroups = {
    {"/dev/serial/by-id/usb-FTDI_USB__-__Serial_Converter_FT******-if03-port0", { 0, 5 }},      // CH4
    {"/dev/serial/by-id/usb-FTDI_USB__-__Serial_Converter_FT******-if02-port0", { 1, 6 }},      // CH3
    {"/dev/serial/by-id/usb-FTDI_USB__-__Serial_Converter_FT******-if00-port0", { 2, 3, 4 }},   // CH1
    {"/dev/serial/by-id/usb-FTDI_USB__-__Serial_Converter_FT******-if01-port0", { 7, 8, 9 }}    // CH2
};
注意
如购买用于连接 485 模块的双绞线,须购买此规格: GH 1.25mm 3P 反向
N100 IMU 接线
打开 bin/imu_receiver.py 并修改最后一行串口 ID,可通过 ls /dev/serial/by-id 查看具体 ID,并将下方代码中******部分替换为真实 ID,注意如果存在多个串口,注意根据命名规律识别。
read_imu_data(port="/dev/serial/by-id/******", baudrate=921600, timeout=1)
关节调零
断开 Qmini 电源,关节电机绿色指示灯全部熄灭,单独给主控电脑(Jetson或树莓派)供电
通过 SSH 登录主控电脑,修改
include/user/Motor_Thread.hpp文件:
std::array<float, 10> Startq = { 0, 0, 0, 0, 0, 0, 0, 0, 0, 0 };
保存并重新编译
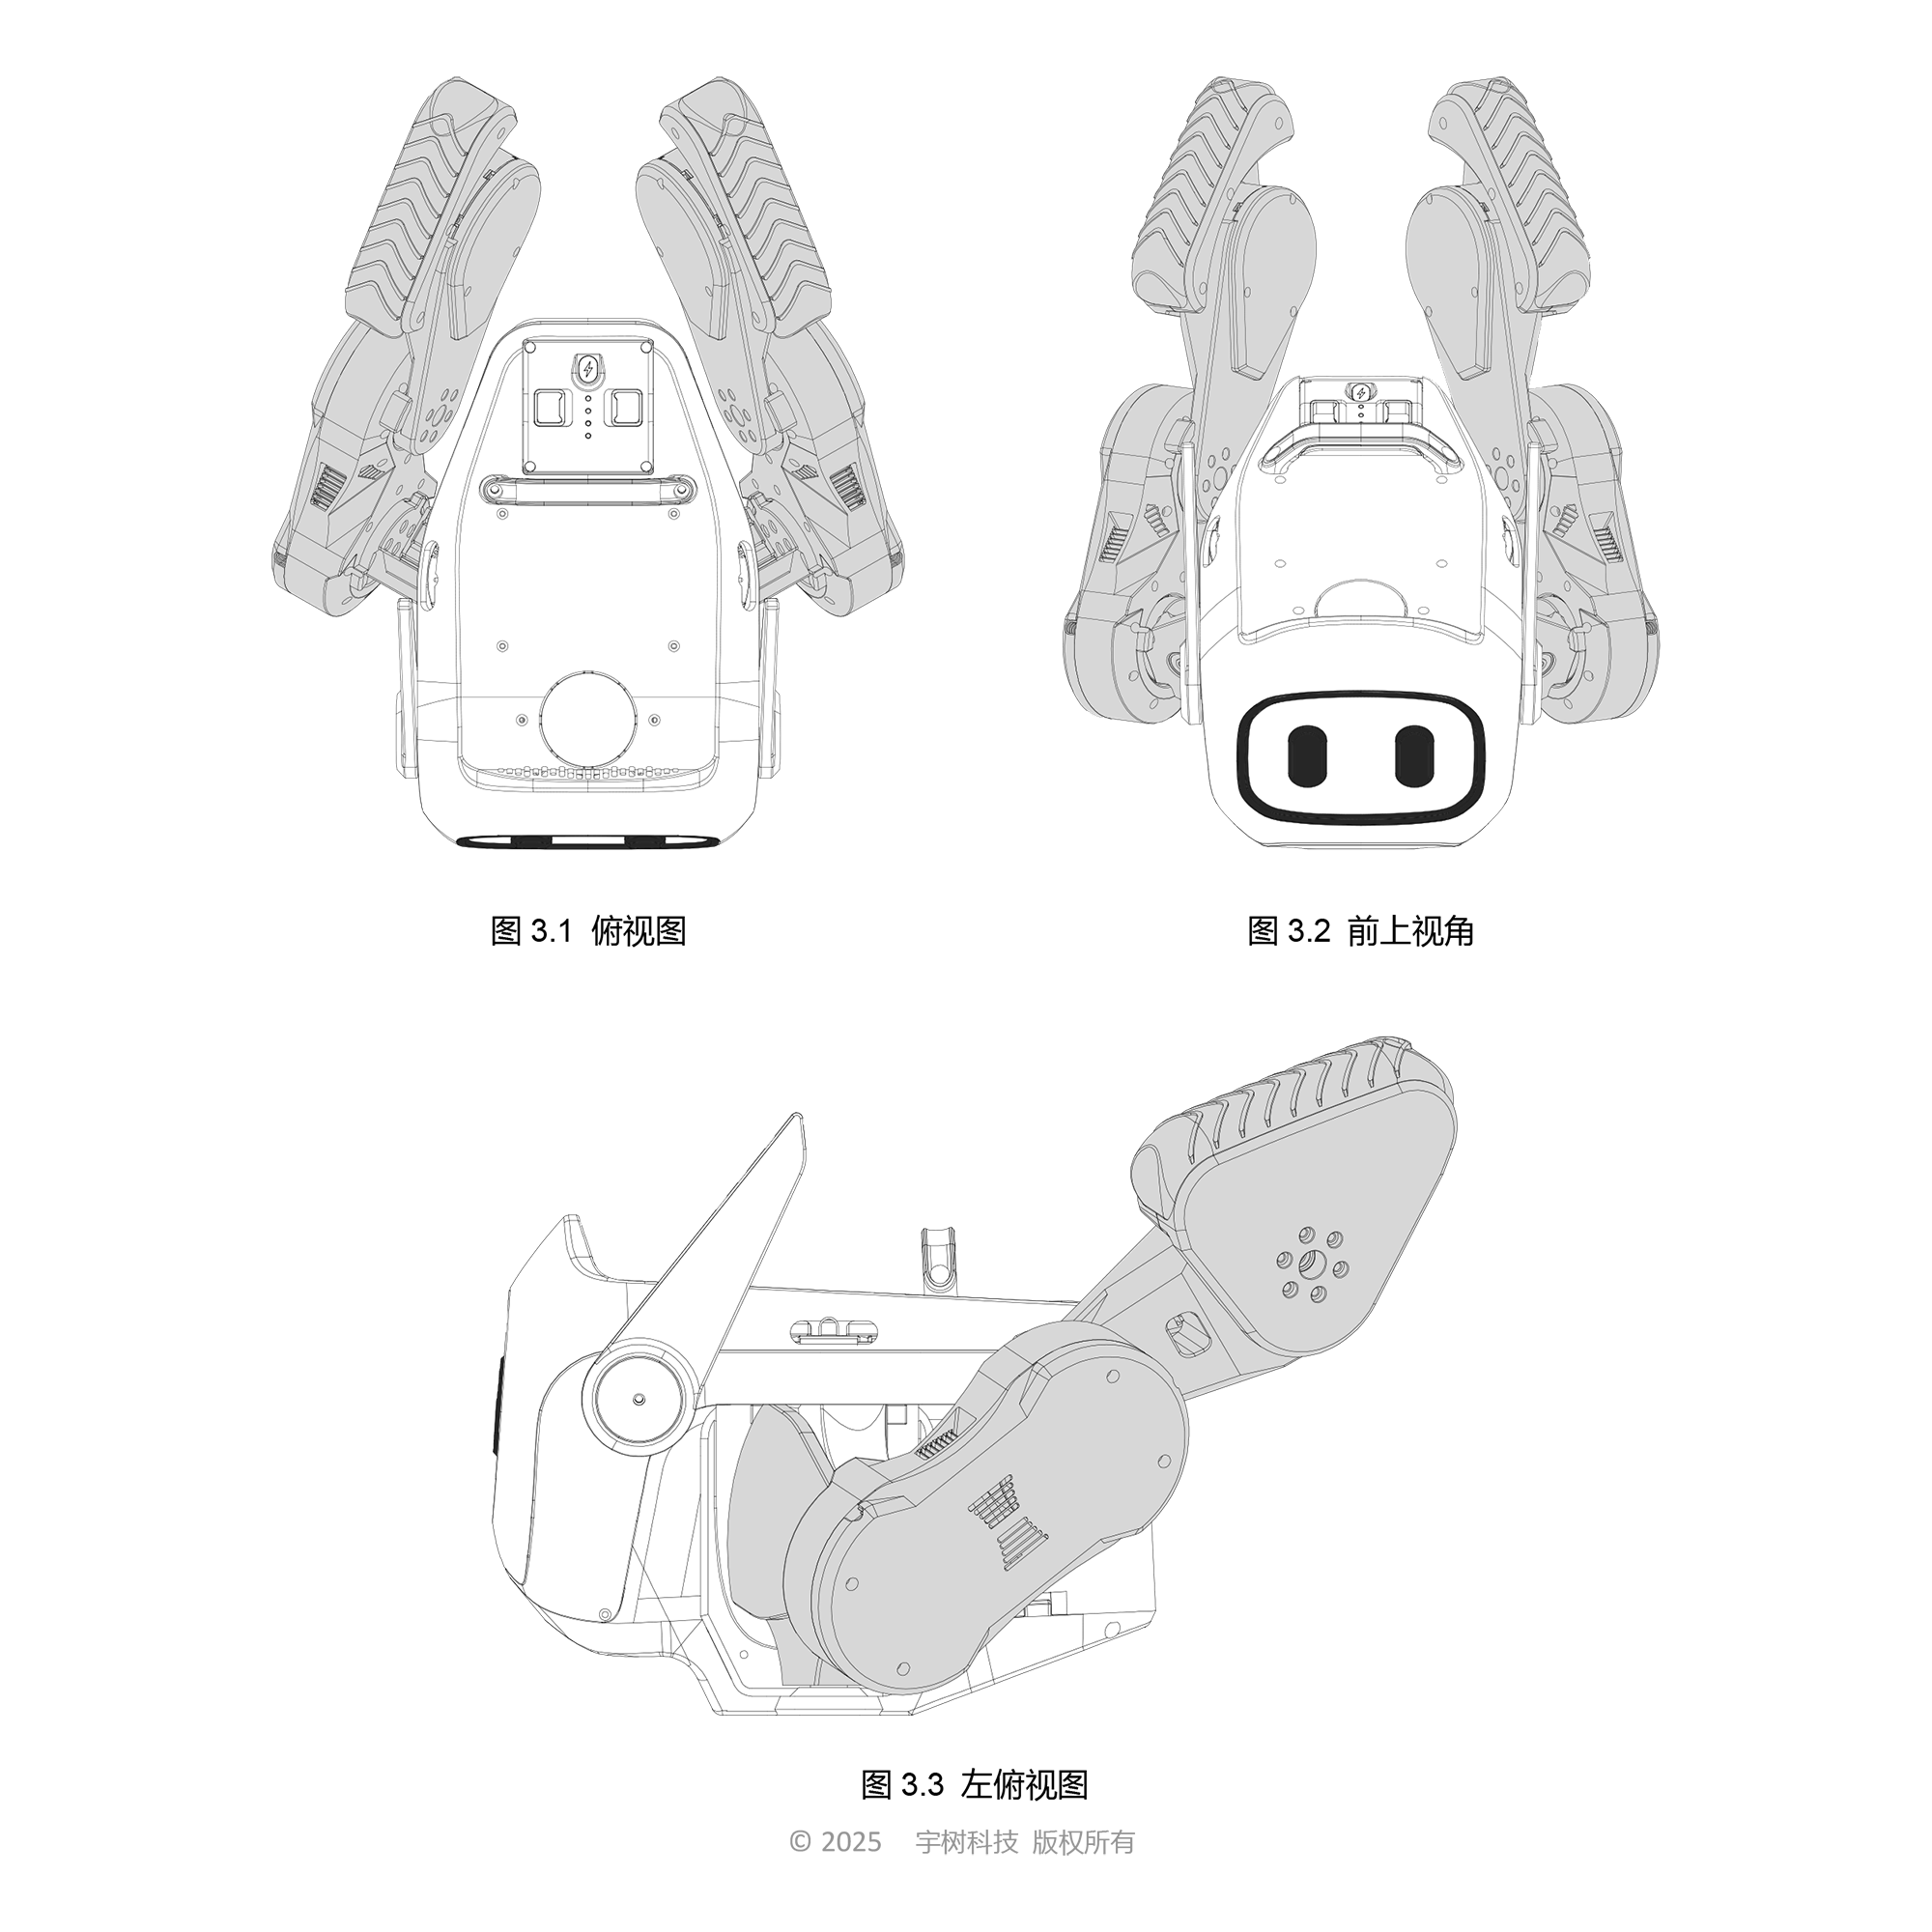
编译完成后,可参考 Qmini 手册中的零位标定姿势(双腿外翻并向后扬起,每个关节均达到限位)即可,并牢记以后只要 Qmini 断电,必须摆放至该姿势后再进行上电。
- 切换至
bin目录,运行run_interface,待数值趋于稳定后,复制任意一组q值,例如:
Joint Positions: [ 0.258718, 0.715168, 0.735215, 0.856924, 0.671364, 0.341304, 0.566484, 0.875408, 0.321766, 0.191299 ]
复制 [] 中的数值,注释掉当前 Startq,将复制好的 10 个数四舍五入后,保留2位小数,并作为新的 q 值,例如:
//std::array<float, 10> Startq = { 0, 0, 0, 0, 0, 0, 0, 0, 0, 0 };
std::array<float, 10> Startq = { 0.26, 0.72, 0.74, 0.86, 0.67, 0.34, 0.57, 0.88, 0.32, 0.19 };
保存,并再次编译
切换至
bin目录,再次运行run_interface,此时你可以发现新打印的数值,几乎都接近零,代表零位标定完成,例如:
Joint Positions: [ -0.00131163, -0.00480904, -0.00481313, -0.00288928, 0.00138591, 0.00128952, -0.00354051, -0.0045384, 0.00176188, 0.00132377 ]
- 修改
bin/config.yaml中的ref_joint_act:
ref_joint_act: [ 0.55, 0.25, -1.35, 1.2, -1.1, -0.55, -0.25, 1.35, -1.2, 1.1 ]
运控 SDK 主程序
VSISLAB 为 Qmini 专门开发了运控程序 SDK,可运行在树莓派或 Jetson 平台。
运控程序特性
- 高性能推理 — 优化的 C++ 实现,配合 ONNX Runtime,为 Unitree Qmini 等机器人提供低延迟、实时策略执行。
- 硬件加速 — 支持 CPU/GPU 后端(包括 CUDA),在基于 Linux 的边缘设备上实现最大推理速度。
- 模块化架构 — 易于使用的 API,便于与自定义机器人硬件、传感器和执行器集成。
- 安全关键设计 — 内置紧急停止机制、传感器验证和故障安全协议,适用于实际操作。
- 实时控制 — 线程安全实现,支持硬实时约束。
- 文档和示例 — 机器人部署和自定义硬件设置的分步指南。
前置条件
- Ubuntu(20.04 或 22.04)
- Python 3 (版本 3.8.12 或更高)
- CMake (版本 2.8.3 或更高)
- Unitree SDK 2
- Unitree Actuator SDK
- Yaml-cpp (版本 0.6.0 或更高)
- Eigen (版本 3.3.7 或更高)
- OnnxRuntime (版本 1.17.1 或更高)
- JsonCpp
- pygame (版本 2.6.1 或更高)
注意
一些参数在 Motor_thread.hpp、run_interface.cpp 和 test_interface.cpp 中是硬编码的。请注意这些参数。 此仓库不再维护。如有任何问题,请发送邮件至 info@vsislab.com。 项目只能在成功安装后运行。
安装依赖
$ sudo apt install -y build-essential cmake libjsoncpp-dev python3-pip python3-serial python3-pygame
$ cmake --version
Unitree SDK 2
编译环境
- 操作系统 (Ubuntu 20.04 LTS 或 22.04)
- CPU (aarch64 或 x86_64)
- 编译器 (gcc 版本 9.4.0)
$ sudo apt install libeigen3-dev
$ cd ~/
$ git clone https://github.com/unitreerobotics/unitree_sdk2
$ cd unitree_sdk2 && mkdir build && cd build
$ cmake .. -DCMAKE_INSTALL_PREFIX=/opt/unitree
$ sudo make install
您可以参考 example/cmake_sample 了解如何将 unitree_sdk2 导入到您的 CMake 项目中。
请注意,如果您将库安装到 /opt/unitree_robotics 以外的其他位置,您需要确保该路径已添加到 ${CMAKE_PREFIX_PATH},以便 cmake 可以通过 "find_package()" 找到它。
如果您只想临时测试,请运行:
$ export CMAKE_PREFIX_PATH=/opt/unitree:$CMAKE_PREFIX_PATH
或者,要使此更改永久生效,请将 export 命令添加到您的 shell 配置文件中。
$ echo "export CMAKE_PREFIX_PATH=/opt/unitree:$CMAKE_PREFIX_PATH" >> ~/.bashrc
$ source ~/.bashrc
验证设置:
$ echo $CMAKE_PREFIX_PATH
替代方案:在 CMake 中直接传递路径,在构建项目时,您也可以明确指定路径:
$ cmake .. -DCMAKE_PREFIX_PATH=/opt/unitree
Unitree Actuator SDK
- 支持电机:GO-M8010-6 电机
- 不支持电机:A1 电机、B1 电机(查看 A1B1 分支以获得支持)
前置条件
- gcc >= 5.4.0 (用于 libUnitreeMotorSDK_M80106_Linux64.so)
- gcc >= 8.3.0 (用于 libUnitreeMotorSDK_M80106_Arm64.so)
运行 gcc -v 命令检查您的 gcc 版本
构建
$ cd /tmp
$ git clone https://github.com/unitreerobotics/unitree_actuator_sdk
$ cd unitree_actuator_sdk && git checkout GO-M8010-6
$ mkdir build && cd build && cmake .. && make
$ sudo cp ../lib/libUnitreeMotorSDK_Arm64.so /usr/local/lib/libUnitreeMotorSDK_Arm64.so
$ sudo ldconfig
宇树电机工具包
- 查看电机 ID
要查看和修改电机 ID,电机必须切换到出厂模式。切换之前,请确保所有电机已经停止工作,并且主机不再向电机发送运动控制指令。
$ cd ~/unitree_actuator_sdk/motor_tools/Unitree_MotorTools_<version>_<architecture>
$ ./swboot /dev/ttyUSB0
在正常情况下,打印的列表中不应出现 ID 大于 15 的电机。若出现这种情况,请断电重启电机后重试。若列表中存在 ID 为 15 的电机,说明该电机尚未分配 ID。请按照以下说明修改电机 ID。
- 修改电机 ID
在修改电机 ID 之前,请确保所有电机已经停止工作,并且主机不再向电机发送运动控制指令。
例如:将总线上所有 ID 为 0 的电机修改为 ID 1。
$ cd ~/unitree_actuator_sdk/motor_tools/Unitree_MotorTools_<version>_<architecture>
$ ./changeid /dev/ttyUSB0 0 1
- 切换回电机模式
查看和修改电机 ID 会将电机切换到出厂模式。若未手动切换回电机模式,即使电机断电重启,它仍会保持在出厂模式。
处于出厂模式的电机,其背面的绿色指示灯会以每秒三次的频率快速闪烁。要切换回电机模式,请使用以下命令:
$ cd ~/unitree_actuator_sdk/motor_tools/Unitree_MotorTools_<version>_<architecture>
$ ./swmotor /dev/ttyUSB0
该命令会将 CAN 总线上所有电机切换回电机模式。此时,电机可以接收运动控制指令。没有固件的电机将无法启动,且其状态会显示在终端上。
- 电机固件升级
GO-M8010-6 电机支持固件升级,可在未来实现性能提升和安全修复。请使用 Unitree 提供的固件文件和 unisp 工具将固件下载到电机中。
命令格式:
$ unisp [串口] [.bin 升级文件] [目标电机 ID]
例如:
$ cd ~/unitree_actuator_sdk/motor_tools/Unitree_MotorTools_<version>_<architecture>
$ ./unisp /dev/ttyUSB0 ./GoM80106_v1.0.bin 0
Yaml CPP
$ cd ~
$ git clone https://github.com/jbeder/yaml-cpp
$ cd yaml-cpp && mkdir build && cd build && cmake ..
$ make && sudo make install
Eigen 模板库
Eigen 是一个用于线性代数的 C++ 模板库:矩阵、向量、数值求解器和相关算法。
$ cd ~
$ git clone https://gitlab.com/libeigen/eigen
$ cd eigen && mkdir build && cd build
$ cmake .. && make && sudo make install
它将被安装到 /usr/local/include/eigen3/
JsonCpp
$ cd ~
$ git clone https://github.com/Microsoft/vcpkg
$ cd vcpkg
$ ./bootstrap-vcpkg.sh
$ ./vcpkg integrate install
$ ./vcpkg install jsoncpp
手柄控制器
蓝牙连接
步骤 1:安装必需的软件包
$ sudo apt install bluetooth
步骤 2:启动蓝牙服务
$ sudo systemctl start bluetooth
$ sudo systemctl enable bluetooth
步骤 3:将 PS4/5 手柄设置为配对模式
- 同时按住 Share + PS 按钮 3 秒
- 指示灯条应开始快速闪烁(白色或蓝色)
步骤 4:使用 bluetoothctl 进行配对
$ bluetoothctl
bluetooth> scan on
# 与手柄配对(将 MAC_ADDRESS 替换为实际地址)
bluetooth> pair XX:XX:XX:XX:XX:XX

# 信任设备
bluetooth> trust XX:XX:XX:XX:XX:XX

# 连接设备
bluetooth> connect XX:XX:XX:XX:XX:XX
bluetooth> exit
按键定义

PS 手柄蓝牙配对脚本
#!/bin/bash
# ps4_pair.sh

echo "将 PS 手柄设置为配对模式(同时按住 Share + PS 按钮 3 秒)"
echo "手柄闪烁时按 Enter..."
read

# 开始扫描并获取 MAC 地址
echo "正在扫描 PS 手柄..."
timeout 10s bluetoothctl scan on &
sleep 5

# 获取无线手柄的 MAC 地址
MAC=$(bluetoothctl devices | grep "Wireless Controller" | awk '{print $2}')

if [ -z "$MAC" ]; then
    echo "未找到 PS 手柄。请确保它处于配对模式。"
    exit 1
fi

echo "找到 PS 手柄:$MAC"

# 配对、信任和连接
echo "正在配对..."
echo -e "pair $MAC\ntrust $MAC\nconnect $MAC\nexit" | bluetoothctl

echo "PS 手柄现在应该已配对并连接!"
使其可执行并运行:
$ chmod +x ps_pair.sh
$ ./ps_pair.sh
USB 连接
在 Ubuntu 22.04 中,您通常需要为通过 USB 连接的 PS4 手柄设置权限。以下是您需要做的:
- 添加 udev 规则
$ sudo nano /etc/udev/rules.d/99-ps4-controller.rules
- 添加以下内容:
# PS4 手柄 (DualShock 4)
SUBSYSTEM=="usb", ATTRS{idVendor}=="054c", ATTRS{idProduct}=="05c4", MODE="0666"
SUBSYSTEM=="usb", ATTRS{idVendor}=="054c", ATTRS{idProduct}=="09cc", MODE="0666"
SUBSYSTEM=="hidraw", ATTRS{idVendor}=="054c", ATTRS{idProduct}=="05c4", MODE="0666"
SUBSYSTEM=="hidraw", ATTRS{idVendor}=="054c", ATTRS{idProduct}=="09cc", MODE="0666"
- 重新加载 udev 规则:
$ sudo udevadm control --reload-rules
$ sudo udevadm trigger
- 验证手柄检测
$ lsusb | grep Sony
# 或检查输入设备
$ ls /dev/input/js*
TPARTS 手柄控制器
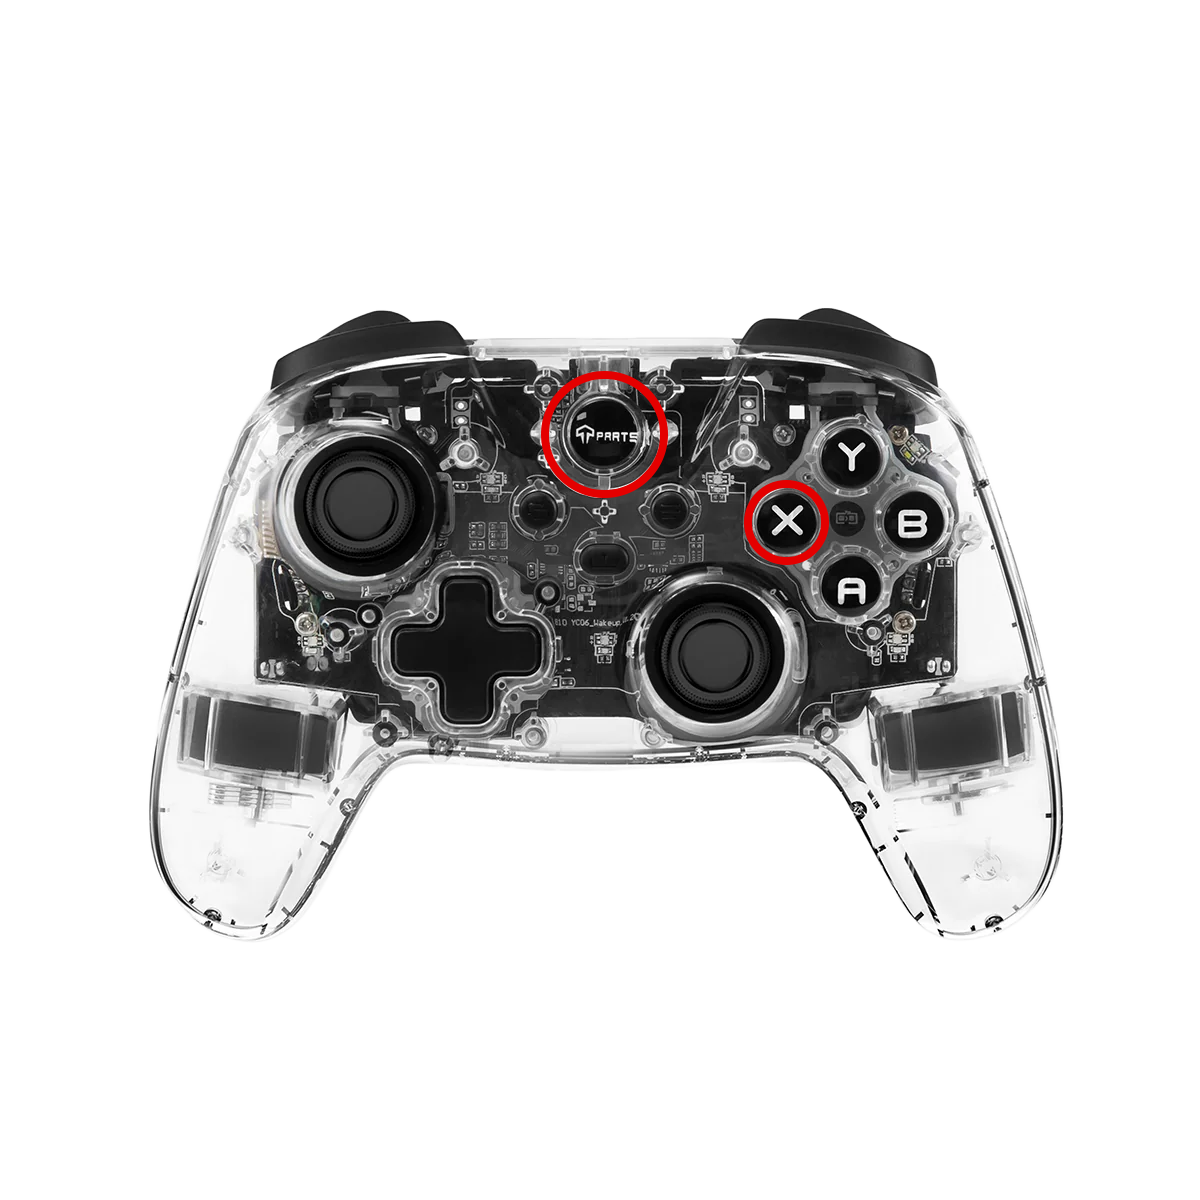
接收器配对方法
将 USB 接收器插入主控电脑后,按下接收器当中按键,接收器红灯快速闪烁,同时长按 Home 键和 X 键,手柄红灯快速闪烁表示配对进行中,配对成功后接收器与手柄控制器显示为蓝色灯,表示配对成功。
飞智沙漠狐手柄
sudo apt update && sudo apt install joystick
ls -l /dev/input/js*
jstest /dev/input/js0
安装 ONNX Runtime GPU (CUDA 12.x)
ONNX Runtime 是一个跨平台的机器学习模型加速器,具有灵活的接口来集成硬件特定的库。ONNX Runtime 可以与来自 PyTorch、Tensorflow/Keras、TFLite、scikit-learn 和其他框架的模型一起使用。
cd /tmp
wget https://github.com/microsoft/onnxruntime/releases/download/v1.19.2/onnxruntime-linux-aarch64-1.19.2.tgz
tar -xzf onnxruntime-linux-aarch64-1.19.2.tgz
sudo cp -P onnxruntime-linux-aarch64-1.19.2/lib/libonnxruntime*.so* /usr/local/lib/
sudo cp -r onnxruntime-linux-aarch64-1.19.2/include/* /usr/local/include/
sudo ldconfig
注意
访问 Jetson Zoo ONNX Runtime 页面,找到与您在 Jetson Orin Nano 上安装的 Python 和 JetPack 版本对应的适当 .whl 文件。复制链接以在您的环境设置中使用。
克隆 RoboTammerSdk4Qmini
$ cd ~
$ git clone https://github.com/vsislab/RoboTamerSdk4Qmini
$ cd RoboTamerSdk4Qmini/lib/onnx
$ sudo cp -r libonnxruntime.so libonnxruntime.so.1.<x>.<x> /usr/local/lib
$ sudo ldconfig
$ cd ~/RoboTamerSdk4Qmini/lib/m8010motor
$ sudo cp libUnitreeMotorSDK_Linux64.so /usr/local/lib/
#或
$ sudo cp libUnitreeMotorSDK_Arm64.so /usr/local/lib/
仿真
- 将 URDF 加载到 robot_state_publisher
$ ros2 run robot_state_publisher robot_state_publisher <robot.urdf>
- 启动 RViz2
$ rviz2
- 配置 Rviz2
- 在 RViz2 中,添加一个 RobotModel 显示。
- 将固定框架设置为您的 URDF 中的根链接(例如,base_link)。
- 您现在应该在 3D 查看器中看到您的机器人。
在真实 Qmini 机器人上操作 RoboTamerSdk4Qmini 的完整步骤
检查 USB 设备识别
插入 Unitree USB 转 485 适配器并运行以下命令:
$ lsusb
它将输出类似这样的内容:
Bus 001 Device 004: ID 0403:6011 Future Technology Devices International, Ltd FT4232H Quad HS USB-UART/FIFO IC
这里,供应商 ID 是 0403,产品 ID 是 6011。记住这两个 ID,稍后在规则中使用它们。
接下来,将当前用户添加到 dialout 组:
$ sudo usermod -a -G dialout $USER
替代方案:使用 udev 规则进行持久权限,创建一个 udev 规则来自动设置权限:
$ sudo nano /etc/udev/rules.d/99-usb-serial.rules
添加这一行:
SUBSYSTEM=="tty", ATTRS{idVendor}=="0403", ATTRS{idProduct}=="6011", MODE="0666", GROUP="dialout", OWNER="ubuntu"
$ sudo udevadm control --reload-rules
$ sudo udevadm trigger
修改
- 通过编辑
include/user/Motor_thread文件修改 USB 转 485 适配器串口。 - 通过编辑
source/run_interface.cpp文件,将网络接口修改为您的 Jetson Orin Nano 或树莓派的实际网络接口。
$ cd ~/RoboTamerSdk4Qmini
$ mkdir -p build && cd build
$ cmake -DPLATFORM=arm64 .. && make && cd ../bin
步骤 1:检查机器人的启动姿态 步骤 2:启动手柄和机器人 步骤 3:运行可执行文件
管理进程
$ ps aux | grep run_interface
$ kill -9 ****
$ ./run_interface
#或
$ sudo ./run_interface
通过手柄对应按键执行切换模式即可开始控制了。
Raspberry Pi 完整安装过程
$ sudo apt update && sudo apt upgrade -y
$ sudo apt autoremove
$ sudo reboot
$ sudo apt install -y cmake g++ build-essential curl zip unzip tar\
            libyaml-cpp-dev python3-pip libjsoncpp-dev libeigen3-dev
$ cd ~/
$ git clone https://github.com/unitreerobotics/unitree_sdk2
$ cd unitree_sdk2 && mkdir build && cd build
$ cmake .. -DCMAKE_INSTALL_PREFIX=/opt/unitree
$ sudo make install
$ echo "export CMAKE_PREFIX_PATH=/opt/unitree:$CMAKE_PREFIX_PATH" >> ~/.bashrc
$ source ~/.bashrc

# Unitree Actuator SDK
$ cd ~/
$ git clone https://github.com/unitreerobotics/unitree_actuator_sdk
$ cd unitree_actuator_sdk
$ git checkout GO-M8010-6
$ mkdir build && cd build && cmake ..
$ make

#YAML-CPP
$ cd ~
$ git clone https://github.com/jbeder/yaml-cpp
$ cd yaml-cpp && mkdir build && cd build
$ cmake .. && make && sudo make install

#Eigen
$ cd ~
$ git clone https://gitlab.com/libeigen/eigen
$ cd eigen && mkdir build && cd build
$ cmake .. && make && sudo make install

#JsonCpp
$ cd ~
$ git clone https://github.com/Microsoft/vcpkg
$ cd vcpkg && ./bootstrap-vcpkg.sh
$ ./vcpkg integrate install
$ ./vcpkg install jsoncpp

# PyGame
$ sudo apt install -y python3-pygame

#RoboTamerSdk4Qmini
$ cd ~
$ git clone https://github.com/vsislab/RoboTamerSdk4Qmini

#Install OnnxRuntime
$ cd RoboTamerSdk4Qmini/lib/onnx
$ sudo cp -r libonnxruntime.so libonnxruntime.so.1.<x>.<x> /usr/local/lib

#Install UnitreeMotorSDK
$ cd ~/RoboTamerSdk4Qmini/lib/m8010motor
$ sudo cp libUnitreeMotorSDK_Arm64.so /usr/local/lib/
$ sudo ldconfig

#Build RoboTamerSdk4Qmini
$ cd ~/RoboTamerSdk4Qmini
$ mkdir -p build && cd build
$ cmake -DPLATFORM=arm64 .. && make && cd ../bin
$ ./run_interface
IMU
修改串口访问权限:
$ sudo usermod -a -G dialout $USER
$ newgrp dialout
为什么会发生这个问题
Serial/UART 设备在 Linux 系统中,默认的所有者是 dialout 用户组,所以我们自己创建的账号没有权限访问。
开机自动启动
创建启动脚本
$ cd ~/RoboTamerSdk4Qmini/bin && nano boot.sh
加入以下命令:
#!/bin/bash

# Wait until PS4 controller appears
while [ ! -e /dev/input/js0 ]; do
  echo "Waiting for PS4 controller..."
  sleep 5
done

# Run Qmini binary
exec /home/ubuntu/RoboTamerSdk4Qmini/bin/run_interface
添加可执行权限:
$ chmod +x ~/RoboTamerSdk4Qmini/bin/boot.sh
创建 Qmini 系统服务
$ sudo nano /etc/systemd/system/qmini.service
加入以下内容:
[Unit]
Description=Qmini Interface Service
After=bluetooth.target
Before=shutdown.target

[Service]
ExecStart=/home/ubuntu/RoboTamerSdk4Qmini/bin/boot.sh
ExecStop=/bin/true
Restart=on-failure
User=ubuntu
WorkingDirectory=/home/ubuntu/RoboTamerSdk4Qmini/bin

[Install]
WantedBy=multi-user.target
启用服务:
$ sudo systemctl daemon-reload
$ sudo systemctl enable qmini.service
$ sudo systemctl start qmini.service
$ sudo systemctl restart qmini.service
如果后期需要修改 qmini.service,每次修改后都要再次运行 sudo systemctl daemon-reload
监视服务:
$ journalctl -u qmini.service -f
SDK 代码解析
act_pos_low 和 act_pos_high
cwiseMax 和 cwiseMin 是 C++ Eigen 库中的函数,用于执行 coefficient-wise(逐元素)的操作。
cwise: 这个前缀是 coefficient-wise 的缩写,意思是操作将分别应用于向量或矩阵的每一个元素。cwiseMax(other_vector): 这个函数会比较调用它的向量和作为参数传入的 other_vector。它会逐个对比两个向量中位置相同的元素,并取其中较大的值,最终返回一个包含这些最大值的新向量。cwiseMin(other_vector): 类似地,这个函数会逐个对比两个向量的元素,但取的是其中较小的值,并返回一个包含这些最小值的新向量。
在 source/user/rl_controller.cpp 文件中:
joint_act = joint_act.cwiseMax(act_pos_low).cwiseMin(act_pos_high);
这行代码是一个链式调用,作用是将 joint_act(关节的目标位置)限制在 act_pos_low(允许的最低位置)和 act_pos_high(允许的最高位置)所定义的范围之内。这个过程通常被称为 钳位 (Clamping)。
它分两步完成:
joint_act.cwiseMax(act_pos_low): 首先,确保joint_act中的每个值都不低于act_pos_low中对应的最小值。如果某个计算出的目标位置低于允许的下限,它就会被拉高到这个下限值。.cwiseMin(act_pos_high): 接着,在上一步结果的基础上,确保每个值都不高于act_pos_high中对应的最大值。如果某个值高于允许的上限,它就会被压低到这个上限值。
简单来说,这行代码保证了无论计算出的目标位置是多少,最终发送给执行器的指令都会被强制约束在预设的安全活动范围 [act_pos_low, act_pos_high] 之内。
强化学习
此仓库提供了一个开源框架,用于双足机器人运动控制,在 NVIDIA 的 Isaac Gym 环境中利用深度强化学习。它使 Unitree Qmini 等机器人能够在崎岖地形上行走,并包括训练期间的关键域随机化和随机推力,以实现仿真到现实的转移。该仓库包含在仿真环境中训练和部署双足机器人的完整代码库。
源代码 URL:https://github.com/vsislab/RoboTamer4Qmini
前置条件
- Ubuntu 18.04 或 20.04
- NVIDIA 驱动程序版本 470+
- 硬件:NVIDIA Pascal 或更新的 GPU,至少 8 GB 显存
- CUDA 11.4+
- Python 3.8+
- PyTorch 2.0.0+
- Isaac Gym Preview (用于仿真环境)
- 其他依赖项(参见 requirements.txt 和安装依赖项)
- Miniconda
安装
$ conda create -n isaac python==3.8 && conda activate isaac
$ pip install torch==2.0.0 torchvision==0.15.1 torchaudio==2.0.0
$ tar -zxvf IsaacGym_Preview_4_Package.tar.gz && cd ./isaacgym/python && pip install -e .
$ pip3 install requirements.txt
$ pip3 install matplotlib pandas tensorboard opencv-python numpy==1.23.5 openpyxl onnxruntime onnx
tune_pid.py
什么是 PID 控制?
PID(比例-积分-微分)是一种反馈控制算法:
P(比例):输出与位置误差成比例的力矩
I(积分):输出与累积误差成比例的力矩(本代码未使用,实际为 PD)
D(微分):输出与速度误差成比例的力矩
本代码使用 PD 控制器(无积分项)。力矩计算公式为:
τ = kp × (期望位置 - 当前位置) + kd × (期望速度 - 当前速度)
为什么机器人训练需要 PID?
- 底层关节控制:RL 策略输出期望关节位置,PID 将其转换为力矩。
- 仿真到实物的迁移:匹配的 PID 参数能缩小仿真与实物的差异。
- 稳定性:合适的增益保证关节稳定且响应及时。
- 真实行为:PID 模拟真实电机控制器,使仿真更贴近实际。
tune_pid.py 的作用
- 目的:调整 PID 参数,减小仿真与真实机器人的行为差异。
主要功能:
- 三种测试模式(第 121 行):
- 'sin':正弦参考信号
- 'real':从 general.txt 回放真实机器人数据
- 'reset':长时间重置测试
- PID 参数设置(第 163-164 行):
stiffness = {'hip_yaw': 55., 'hip_roll': 105., 'hip_pitch': 75., 'knee': 45., 'ankle': 30.}
damping = {'hip_yaw': 0.3, 'hip_roll': 2.5, 'hip_pitch': 0.3, 'knee': 0.5, 'ankle': 0.25}
不同关节类型使用不同增益。
- 力矩计算(第 207-210 行):
def compute_torques(actions, joint_pos, joint_vel, joint_pos_inc):
  error = actions - joint_pos
  torques = kp * error + kd * (joint_pos_inc * enable_d_ctrl - joint_vel) - 3.5 * torch.sign(joint_vel) * joint_vel_sign + joint_tor_offset
包含摩擦补偿和力矩偏移。
- 延迟模拟(第 171 行):
s_nsteps_ago = -90 # 模拟传感器延迟(Qmini_V1 约为 25ms)
模拟真实传感器延迟。
- 数据收集与可视化:
- 记录关节位置、速度、力矩和动作
- 生成仿真与真实数据的对比图
- 将结果保存为 Excel
- 真实数据对比(第 185-193 行):
- 从 general.txt 加载真实机器人数据
- 使用真实 PID 增益计算期望力矩
- 对比仿真输出与真实行为
训练阶段:RL 策略学习输出关节位置,PID 将其转换为力矩(见 env/legged_robot.py:414) 调参阶段:tune_pid.py 寻找使仿真与真实硬件匹配的 PID 增益 部署阶段:调好的增益用于仿真训练和真实机器人部署
为什么重要
- 仿真到实物的差距:不匹配的 PID 增益会导致仿真与硬件动力学不一致。
- 训练效率:真实的底层控制有助于 RL 策略学习。
- 安全性:合适的增益可避免振荡和不稳定。
何时使用 tune_pid.py?
- 训练 RL 策略之前:建立与真实机器人匹配的 PID 参数基线
- 硬件变更后:重新校准 PID 参数
- 仿真到实物迁移失败时:诊断并修复仿真与真实机器人的差异
- 机器人开发过程中:验证仿真动力学是否匹配真实行为
如何使用 tune_pid.py?
基本命令:
# 测试正弦输入响应
python tune_pid.py --mode sin

# 与真实机器人数据对比(需要 general.txt 文件
python tune_pid.py --mode real

# 测试重置行为
python tune_pid.py --mode reset
工作流程:
- 运行测试 → 2. 查看生成的图表和 Excel 数据 → 3. 调整参数 → 4. 重复直到仿真与真实机器人匹配 → 5. 将调好的参数复制到配置文件 输出结果:
- 图表:
experiments/tune_pid/real/pid1.5hz/joint_pos_*.png
- Excel 数据:
experiments/tune_pid/real/pid1.5hz/sim_pid_<mode>.xlsx
总结
tune_pid.py 是一个校准工具,用于:
- 独立测试 PID 参数(不依赖 RL)
- 对比仿真行为与真实机器人数据
- 寻找最小化仿真到实物差距的增益
- 提供可视化和数据导出用于分析
这对于机器人控制的仿真到实物迁移至关重要。
训练 train.py
这个脚本是做什么的?
train.py 用 PPO(Proximal Policy Optimization)训练机器人。机器人通过:
- 在仿真环境中执行动作。
- 根据表现获得奖励。
- 逐步更新策略以获得更高奖励。
可以理解为:尝试 → 得分 → 调整行为 → 重复。
这里用到的 RL 基本概念
- 环境(Environment):机器人运行的模拟器
- 观测(Observation):机器人能感知到的数值输入
- 动作(Action):机器人输出的控制命令
- 奖励(Reward):用于指导学习的得分
- 策略(Actor):负责选择动作的模型
- 价值(Critic):预测状态好坏的模型
- 采样(Rollout):从环境收集的一段轨迹
- 迭代(Iteration):一次 "采样 + 更新策略" 的循环
如何运行
训练(默认:test):
$ python train.py --config BIRL --name <NAME> --render --num_envs 10
- --name # 实验名称(将 <NAME> 替换为 q2 用于 Qmini),覆盖配置文件中的设置
- --config # 实验配置文件(默认:'config.Base'),覆盖默认配置
- --resume # 从检查点恢复训练(默认:test),需要指定检查点 'path'
- --render # 布尔标志(默认:False),始终强制关闭显示
- --fix_cam # 布尔标志(默认:False),在环境 0 中固定相机视角在机器人上
- --horovod # 布尔标志(默认:False),启用 Horovod 多 GPU 训练
- --rl_device # RL 设备(默认:'cuda:0'),支持 'cpu'/'cuda:0' 等格式
- --num_envs # 环境数量(默认:None),覆盖配置文件设置
- --seed # 随机种子(默认:None),覆盖配置文件设置
- --max_iterations # 最大迭代次数(默认:None),覆盖配置文件设置
提示
髋关节 YAW 轴的活动范围设定为 -0.349 到 0.525 弧度,这个数值既保证步态灵活性,又避免机械干涉。
训练过程中发生了什么
- 读取配置
脚本读取命令行参数和配置文件:
--config选择config/目录下的配置。--name指定实验名称(用于保存结果)。
- 创建目录并记录日志
会创建:
experiments/<name>/model/保存模型experiments/<name>/log/保存 TensorBoard 日志
- 构建环境与任务
环境是模拟器,任务定义:
- 如何生成观测。
- 如何计算奖励。
- 什么时候结束一回合。
- 构建策略网络与价值网络
会创建两套神经网络:
- Actor:输出动作
- Critic:估计当前状态的好坏
- 继续训练(可选)
如果使用 --resume <old_experiment_name>,脚本会加载之前的模型并从上次的迭代继续。
- 训练循环
每次迭代包括:
- 收集采样
- Actor 选择动作。
- 环境返回观测和奖励。
- 计算回报
- 估计每一步的好坏。
- 更新策略
- PPO 调整 Actor 和 Critic,让奖励提升。
- 保存与记录
- 保存
policy.pt - 将指标写入 TensorBoard
会保存哪些内容
在 experiments/<name>/ 下:
model/policy.pt- 最新模型model/all/policy_<it>.pt- 周期性快照model/cfg.yaml- 训练时使用的完整配置log/- TensorBoard 日志
代码对应关系
- 参数读取:
env.utils.get_args - 环境:
env.LeggedRobotEnv - 任务:
env.tasks.load_task_cls - 策略/价值网络:
model.load_actor,model.load_critic - 训练算法:
rl.alg.PPO
常见问题
为什么要两个网络(Actor 和 Critic)?
Actor 决定怎么做,Critic 评估做得好不好,这样学习更稳定。
PPO 是什么?
PPO 是一种稳定的 RL 算法,会让策略逐步更新,不会突然变化过大。
为什么要并行多个环境?
并行环境可以更快收集数据,加速训练。
小贴士
- 打开
--render会明显变慢。 - 如果 GPU 显存不足,降低
--num_envs。 - 同名
--name会清空旧日志;建议用新名字。
常用命令
开始训练:
python train.py --config <config_name> --name <experiment_name>
继续训练:
python train.py --config <config_name> --name <new_name> --resume <old_name>
打开 TensorBoard:
tensorboard --logdir experiments/<experiment_name>/log
训练新策略
$ python train.py --config BIRL --name qmini_experiment
评估新训练的策略
$ python play.py --render --name qmini_experiment --time 10
导出模型用于部署
$ python export_pt2onnx.py --name qmini_experiment
虽然核心控制基于深度学习,但底层电机控制仍需要精确的工程调优。
项目提供了PID参数优化工具,帮助减小仿真与实际机器人行为之间的差异:
优化底层控制参数
$ python tune_pid.py --mode real
基于官方项目结构进行定制
需要修改config文件、reward函数等核心模块
$ python train.py --config custom_config --name your_experiment