PowerSchool
PowerSchool Student Information System
What is PowerSchool?
PowerSchool是一个全美教育管理系统的领先供应商。它为学校和学区提供了一套用于管理和监控学生信息的工具,如成绩,出勤率,行为和更多。它可以通过网络接口使家长,老师和学生自行访问相关信息。PowerSchool也提供其他的学校管理工具,包括课程注册,财务管理,特殊教育管理等。
PowerSchool的目标是通过提供现代化的,整合的学校信息管理系统来提升教育效果,让老师能够专注于教学,家长能够更方便地参与子女的学习过程,而学校和学区管理员可以更有效地管理学校运营。
![]()
System Requirements
一般要求 每个 PowerSchool SIS 配置都必须满足以下要求:
专用硬件:生产环境中的所有服务器都必须专用于 PowerSchool SIS 产品及其补充组件的操作,例如 PowerTeacher Pro 和 ReportWorks。 服务器级:本文档中引用的所有硬件都必须是服务器级硬件,除了 PowerScheduler 客户端和用户工作站。 动态端口范围:默认动态端口范围符合 Microsoft Windows Server 2012 R2、Windows 2016 或 Windows Server 2019 要求(视情况而定)。 为了正常运行,同一 PowerSchool SIS 中的所有 PowerSchool SIS 应用程序服务器实例必须在同一个 VLAN/子网中配置。 虚拟专用网络 (VPN):自托管 PowerSchool SIS 需要 VPN 连接已实施统一课堂的客户。 负载平衡:两个或多个应用程序节点的服务器阵列环境必须由负载均衡器。正确配置的负载均衡器将适当地分配传入用户流量到多个 Tomcat 应用程序节点服务器,优化性能和可扩展性。此外,负载均衡器可以提供卸载 SSL/TLS 的能力事务和缓存静态 PowerSchool SIS 内容。欲了解更多信息,请参阅负载平衡器要求和配置指南。 Windows 操作系统:PowerSchool SIS 支持 Microsoft Windows Server 2012 R2,Windows Server 2016 和 Windows Server 2019,标准版和数据中心版 (英文版)。
推荐的硬件规格 对于将要新购服务器的新客户,或寻求升级服务器硬件的现有客户,以下推荐的规格可供参考。 推荐的服务器配置规格为您今后的发展提供了增长空间,并且随着新的 PowerSchool SIS 版本和功能的推出,保持在未来几年内可用。
独立一台 - 最高可支持 3,000 名学生 最高可支持 3,000 名学生,这是单台服务器 Microsoft Windows Server 解决方案,Oracle 数据库和 PowerSchool Tomcat 应用程序驻留在同一台服务器上。
| 硬件 | 物理主机 | 虚拟主机 |
|---|---|---|
| 处理器 | (2) 8-Core CPUs | (12) Virtual CPUs |
| 内存 | 32GB 内存 | 32GB 虚拟内存 |
| 存储 | ||
| PowerSchool 系统文件 | 100GB (512n Format) | 100GB (Fixed/Thick) |
| Disk Subsystem | 15k SAS or SSD/RAID 1 | 15k SAS or SSD Virtual Disk 1 |
| Oracle 数据库 | 250GB (512n Format) | 250GB (Fixed/Thick) |
| Disk Subsystem | 15k SAS or SSD/RAID 10 | 15k SAS or SSD Virtual Disk 2 |
双服务器解决方案 - 最高可支持 3,000 至 7,000 名学生 这是一个包含数据库和 Tomcat 应用程序的双服务器 Microsoft Windows Server 解决方案,Oracle 数据库和 PowerSchool Tomcat 应用程序分别驻留在专用的单独服务器上。 最多可容纳 7,000 名学生。
PowerSchool 应用程序专用服务器
| 硬件 | 物理主机 | 虚拟主机 |
|---|---|---|
| 处理器 | (2) 8-Core CPUs | (12) Virtual CPUs |
| 内存 | 32GB 内存 | 32GB 虚拟内存 |
| 存储 | ||
| PowerSchool 系统文件 | 100GB (512n Format) | 100GB (Fixed/Thick) |
| Disk Subsystem | 15k SAS or SSD/RAID 1 | 15k SAS or SSD Virtual Disk 1 |
Oracle 数据库专用服务器
Oracle 数据库专用服务器
| 硬件 | 物理主机 | 虚拟主机 |
|---|---|---|
| 处理器 | (2) 8-Core CPUs | (12) Virtual CPUs |
| 内存 | 32GB 内存 | 32GB 虚拟内存 |
| 存储 | ||
| Oracle 数据库 | 250GB (512n Format) | 250GB (Fixed/Thick) |
| Disk Subsystem | 15k SAS or SSD/RAID 10 | 15k SAS or SSD Virtual Disk 2 |
测试用服务器
客户可以选择设置一台非生产环境测试服务器,用于各种目的,例如培训、 测试、开发和成绩报告。 由于这些环境通常不会接收大量用户负载,您可以将这些环境配置为单服务器 Microsoft Windows Server,同时运行 PowerSchool 应用程序和 Oracle 数据库的解决方案。
| 硬件 | 物理主机 | 虚拟主机 |
|---|---|---|
| 处理器 | (2) 8-Core CPUs | (12) Virtual CPUs |
| 内存 | 32GB 内存 | 32GB 虚拟内存 |
| 存储 | ||
| PowerSchool 系统文件 | 100GB (512n Format) | 100GB (Fixed/Thick) |
| Disk Subsystem | 15k SAS or SSD/RAID 1 | 15k SAS or SSD Virtual Disk 1 |
| Oracle 数据库 | 250GB (512n Format) | 250GB (Fixed/Thick) |
| Disk Subsystem | 15k SAS or SSD/RAID 10 | 15k SAS or SSD Virtual Disk 2 |
文件服务器
PowerSchool SIS 文档附件使管理员能够将文档附加到学生 记录在 PowerSchool 的管理员门户中。 如果您打算使用此功能,则需要 考虑对您的数据存储和网络带宽需求的影响。 有三个初级 估计基本存储需求的注意事项:
- 每个学生要附加的文件的估计数量
- 要附加的文件的估计大小
- 5% 的附件元数据文件分配 例如,如果您的学区有 1,000 名学生,您预计每个学生平均有 10 个附件 学生,并且您预计附件文件的平均大小为 300 KB,那么您需要一个 至少大约 3 GB 的存储空间,用于将文件附加到学生记录:
计算方法
| 附件总数 | 所需存储空间 |
|---|---|
| 10 attachments x 300 KB attachment size | 3,000 KB per student |
| 3,000 KB x 1,000 students | 3,000,000 KB for all students |
| (3,000,000 KB / 1,048,576 KB per GB) * (1 + 5% for attachment metadata) | 3 GB storage |
在计算您的真实存储需求时,还需要考虑其他因素:
- 学生人数年增长率
- 附件保留和归档政策(例如,毕业后的年数已保存附件)
- 实施数据备份策略
- 在存储设备上实施文件压缩或加密应考虑
这些因素以确保 PowerSchool 的无缝和不间断使用 SIS 文件附件。 PowerSchool SIS 还建议您检查您的网络带宽 如果实现此功能,因为不同大小的文件在整个过程中被上传和下载 典型的一天可能需要增加网络带宽。注意:PowerSchool SIS 文档附件需要实施 SSL。 更多 有关为 PowerSchool SIS 实施 SSL 的信息,请参阅知识库文章。
常规建议
成功部署 PowerSchool 不需要以下建议,但出于与数据安全、冗余、性能和 效率。
- RAID 的冗余和性能:独立磁盘冗余阵列 (RAID) 是一种 标准技术,通过冗余提供更高的存储可靠性,并且在 某些配置会提高性能。 PowerSchool 建议使用 RAID 10 (带有磁盘条带化的磁盘镜像)以增加数据库的冗余和性能 Oracle 数据库文件、Oracle 重做日志和 Oracle 闪回恢复区文件的服务器。然而, 较大的地区可能会发现 RAID 5 是一个合适的替代方案,每个磁盘的成本更低,适用于 Oracle 闪存 恢复区文件。
- 网络带宽指南:网络带宽因地区而异 不同的因素,例如网络类型和配置以及各地区的使用模式。 以下数据可用作计算您的区级需求的起点,并且是 基于采样 PowerSchool SIS 页面的网络流量:
- 最多 3,000 名学生:1.52 Mbs
- 3,000 至 7,000 名学生:3.55 Mbs
- 7,000 至 15,000 名学生:7.61 Mbs
负载均衡
负载均衡器简介
负载均衡器也称为应用程序交付控制器设备,是由两个或多个 Tomcat 应用程序服务器组成的 PowerSchool SIS 服务器阵列部署。正确配置负载均衡器会将传入的用户流量适当地分配到多个 Tomcat 应用程序节点服务器,从而优化性能和可扩展性。
此外,负载平衡器可以提供卸载 SSL/TLS 事务的能力,以及提供 PowerSchool 缓存内容。尽管 PowerSchool 既不支持也不认证,但任何负载平衡器设备只要配置正确,都可以在生产环境中成功运行。 PowerSchool 不认可或直接支持任何第三方售卖的负载均衡器配置。特定负载均衡器制造商应为其负载均衡器设备提供产品配置支持。
Cisco、F5 和 KEMP Technologies 设备(以及其他设备)都应满足 PowerSchool SIS 的负载平衡要求。 本文档的目的是让 PowerSchool 客户了解特定于 PowerSchool SIS 应用程序的负载平衡要求。本文档讨论了在负载平衡环境中实施 PowerSchool SIS 的配置设置。这些信息是确保系统可用性和高质量用户体验所必需的。该文档未提供有关如何安装或配置单个负载平衡器的分步说明。有关如何安装和配置各种负载均衡器解决方案的信息,请参阅负载均衡器制造商的文档。 当 PowerSchool SIS 应用程序部署在负载平衡的环境中时,PowerSchool 为它本身提供应用程序支持。但是,PowerSchool 不为 PowerSchool 技术支持定义中的负载均衡器本身的配置和性能提供直接支持。 PowerSchool 确实为客户提供咨询服务,以集成和支持各种负载平衡解决方案。联系您的 PowerSchool 客户主管或发送电子邮件至 TSGHelpDesk@powerschool.com 了解更多详情。
网络拓扑结构
负载均衡器是具有两个或多个网络端口的多宿主设备。网络地址翻译 (NAT) 用于翻译来自外部虚拟服务器或虚拟服务器的所有请求服务到内部真实服务器。可以引用外部虚拟服务器或虚拟服务to 作为将基于 TCP 端口侦听传入请求的单个 TCP/IP 地址。您的 PowerSchool SIS 域名的 DNS 记录应对应于这些虚拟服务器或虚拟服务 TCP/IP 地址。拥有多个虚拟服务器或虚拟服务是很常见的基于您的 PowerSchool SIS 部署。到虚拟服务器或虚拟服务器的传入流量然后服务将被定向到内部真实服务器,即实际的 PowerSchool SIS 服务器。第 7 层网络透明度与 PowerSchool 负载平衡环境一起使用。网络透明度提供了保留客户端的源 IP 地址并将其呈现给 PowerSchool SIS 应用程序服务器。如果您打算使用 PowerSchool SIS 安全性,这是必需的由于登录尝试失败而禁用 PowerSchool SIS 用户帐户的功能。这PowerSchool SIS 安全功能不仅会禁用 PowerSchool SIS 帐户,还会禁用客户端的源 IP 地址。负载均衡器必须配置为双臂配置,并且必须满足以下条件成功实施网络透明度:
- PowerSchool SIS 服务器必须配置在不同于任何子网的唯一子网上内部客户端使用它来访问由负载平衡器设备。
- 在唯一子网上配置的 PowerSchool SIS 服务器必须配置 PowerSchool SIS 服务器的 TCP/IP 默认网关指向 TCP/IP 地址绑定到负载均衡器的服务器端接口。
- 用于 PowerSchool SIS 服务器的唯一子网应该只有一个默认网关在唯一的子网上,该子网将是绑定到服务器端的 TCP/IP 地址负载均衡器接口。
- PowerSchool SIS 服务器必须配置在同一个唯一的子网中,包括PowerSchool SIS Oracle 服务器。由于负载均衡器是多宿主设备,因此有多种配置可用于支持基于您的网络对外部虚拟服务器或虚拟服务的传入请求拓扑要求。虽然您的部署可能会根据您所在地区的安全策略而有所不同,但下面列出的两个示例是用于 PowerSchool SIS 负载平衡环境的最常见配置
Setup Schools
Years and Terms
在 PowerSchool 系统中,学年(Years)和学期(Terms)都是关于学校日历和课程安排的关键部分。
学年(Years):在PowerSchool中,Year 通常指的是学校的学年,这是学校日历的基础。一个学年通常包含两个学期,通常是秋季和春季学期,但实际情况可能会根据学校的具体安排有所不同。在PowerSchool中,学年被用来安排课程,跟踪学生的进度,以及生成报告。
学期(Terms):在PowerSchool中,Terms 通常指的是学年中的各个学期。这可能包括秋季和春季学期,也可能包括夏季学期或其他的短期课程。每个学期都会有自己的课程安排和成绩报告。在PowerSchool中,学期被用来组织课程,安排考试,以及计算期末和学年成绩。
这两个概念对于PowerSchool系统的运作非常重要,因为它们决定了课程如何被安排,学生如何被评估,以及成绩如何被报告。
Setup FTE (Full-Time Equivalent)
在 PowerSchool 和其他教育环境中,FTE 或 Full-Time Equivalency(全日制等效)是一个衡量学生或教职员工的学习或工作时间相对于全日制学习或工作时间的度量。
对于学生,FTE 通常基于学生在学校课程中花费的时间。例如,如果一个学生只上半天课,那他们可能被视为 0.5 FTE 的学生。同样,如果一个学生只上某个课程的一部分,那他们在那个课程的 FTE 可能会相应地减少。
对于教职员工,FTE 是基于他们工作的时间与全职工作时间的比例。例如,如果一个教师每周工作 20 小时,而全职工作是 40 小时,那么这个教师的FTE 就是 0.5。
FTE 是一个有用的工具,可以帮助学校和学区更好地理解和管理他们的资源。例如,通过计算学生和教职员工的 FTE,学校可以更好地安排课程,分配教职员工,以及理解学校的资金需求。
创建 FTE
在创建 FTE 之前,需要首先检查 Attendance Preferences 中已经开启了 Meeting 或者 Daily 是否开启。Attendance Preferences 对 District 无效,首先切换至特定校区。
切换行政单位后,路径:School Management -> Attendance -> Attendance Preferences
Attendance Code
Examples:
Present can not use code, leave it blank.
| Code Name | Code | Status |
|---|---|---|
| School Activity | S | Present |
| Guided Independent Study | GIS | Present |
| Absent Excused | AE | Absent |
| Tardy | T | Present |
| Online Learning | O | Present |
| Absent Unexcused | AU | Absent |
| Quarantine | Q | Present |
| Present | Present |
Attendance Code Category
- Switch to the school you want to manage attendance codes.
- Go to School Setup.
- Click Attendance Code Categories
Examples
- Excused
- Unexcused
- Tardy
- Illness
Attendance Conversions
Final Grade/Reporting Term Setup
使用 Final Grade/Reporting Term Setup 页面设置您学校的评分周期和参数。
定义学年中每个评分学期的日期以及教师输入该学期最终成绩的作业名称。设置最终成绩条目也可以在 PowerTearcher 中完成。 在一所学校同时要求学期报告学期和学期报告学期的情况下,合并学校可以防止在该学校的期末成绩中使用基于学期的加权。
当您在每个学期末存储最终成绩时,您会存储一个特定的最终成绩,例如 Q1。在存储最终成绩之前,您必须在 PowerSchool 中设置最终成绩。确保已完成以下步骤,以便教师可以将学生的成绩报告给 PowerSchool。您必须为共享您的 PowerSchool 服务器的每所学校设置最终成绩。 在 PowerSchool 中设置最终成绩后,信息会自动发送到每位教师的成绩簿。一次设置一个学期的最终成绩。当您为一个学期设置最终成绩时,您只会影响属于该学期的课程。例如,第一学期的课程只属于第一学期;它不属于第 1 季度、第 2 季度或整个学年。如果您没有为评分学期定义最终成绩设置,教师将无法在成绩簿中输入成绩。
定义最终成绩/报告期限
- 在开始页面上,在主菜单中选择 School。
- 单击 Final Grade/Reporting Term Setup。
- 单击要为其设置最终成绩的学期下的 NEW。
- 输入术语的名称,例如 Q3。
- 输入学期的开始和结束日期。
- 选择禁止字母等级显示以仅在系统和报告中显示百分比等级。
- 选择抑制百分比显示以仅在系统和报告中显示字母等级。
- 输入达到或高于此出勤点水平的值会自动影响学生的出勤成绩。
- 然后,输入学生在达到或超过将学生成绩更改为的出勤分数后获得的成绩。
- 单击提交。
Teacher Assignments
在构建课程表之前,有必要告诉 PowerScheduler 老师对应哪些课程,有多少个 Section,上述操作是通过创建 Teacher Assignments 来实现。
注意:Teacher Assignment 是预先构建流程。Assignment 选项不会显示在 Load only scenarios 下拉菜单中。
批量导入
批量导入数据,需要使用 Quick Import 界面。打开 PowerSchool 首页,点击左侧 Special Functions。
选择 Schedule (Master Schedule):
预检工作:
- 检查当前 School Years & Terms,确认已经填写 Import File Term #
- 检查教师 TEACHER_NUMBER 已经创建,并已分配到所在的 School
- 准备导入文件:
- COURSE_NUMBER
- SECTION_NUMBER
- TERM_ID
- TEACHER_NUMBER
- EXPRESSION
- ROOM
- DEPENDENT_SECS
- ATTENDANCE_TYPE_CODE
- ATT_MODE_CODE: ATT_ModeMeeting
- ExcludeFromClassRank
- ExcludeFromGPA
- ExcludeFromHonorRoll
- ExcludeFromStoredGrades
- Exclude_ADA
- Exclude_State_Rpt_YN
- MaxEnrollment
- 检查是否有多余空格,检查“逗号”,“括号”是否存在全角符号,检查 Period 是否合规,Period 设置参考: Start Page -> School -> Periods
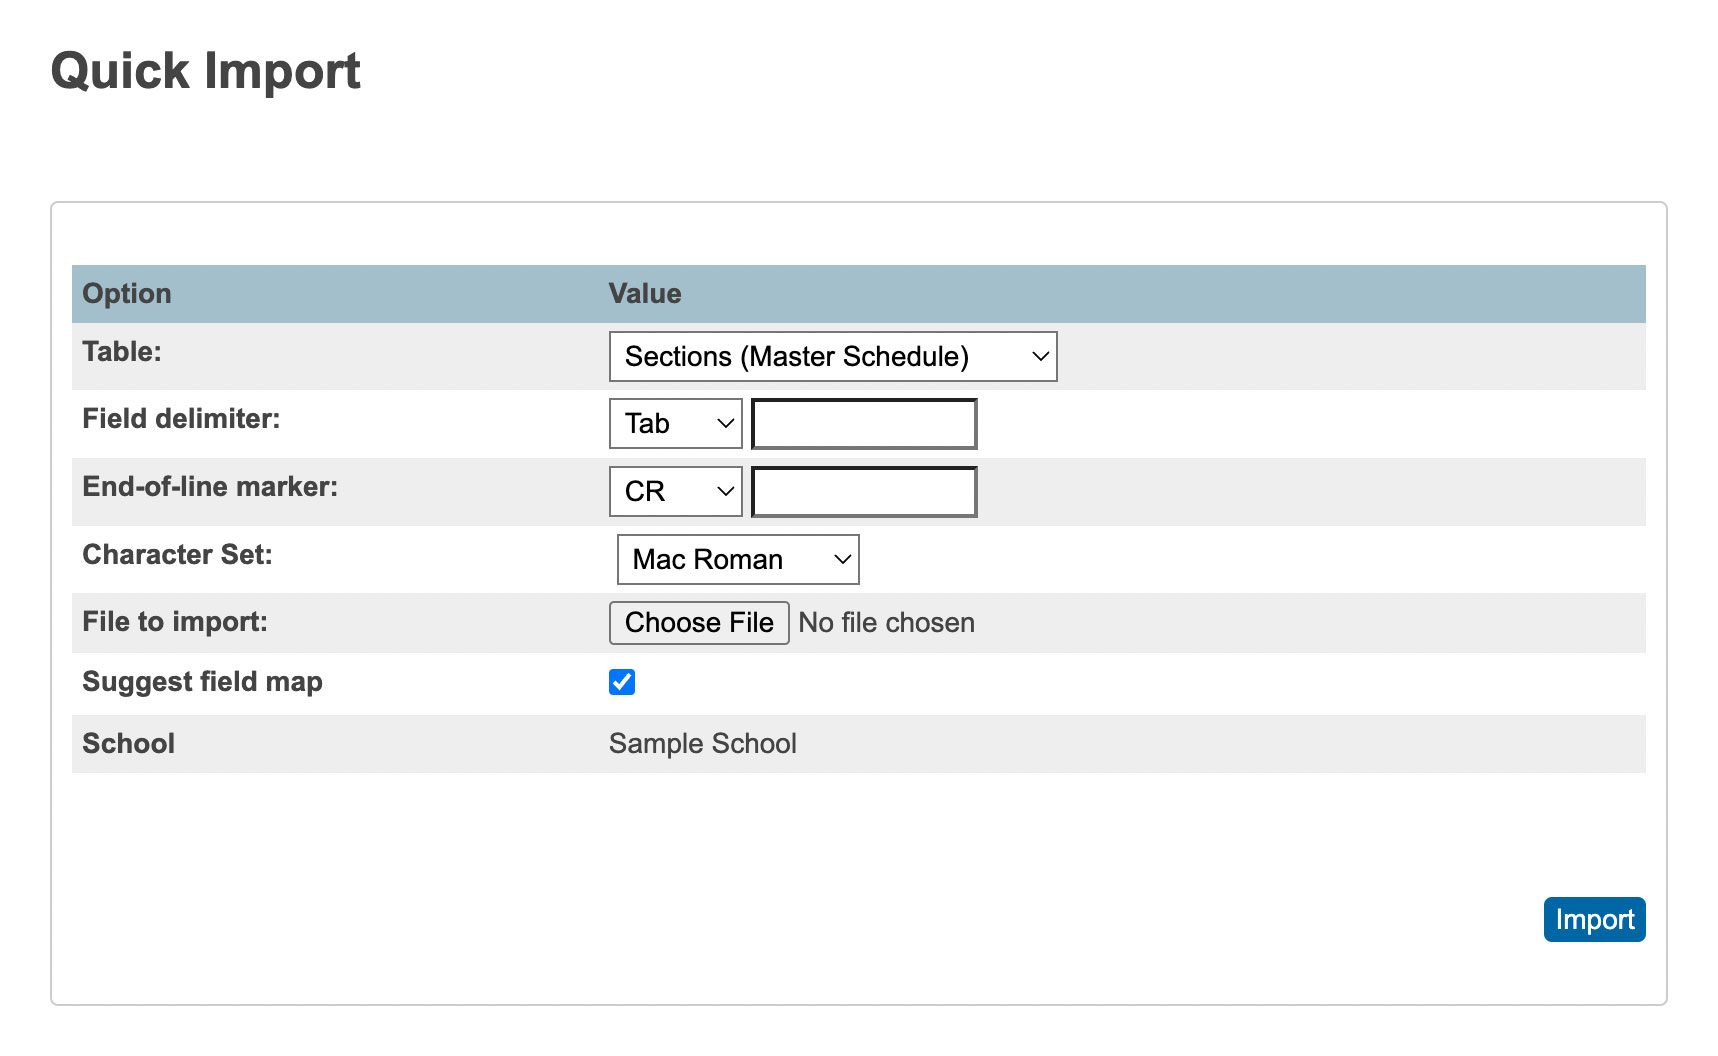
Browse for the file. Check the box, "Suggest field map" and submit the page.
The next page that appears will have a field map. Verify that all the exported fields fields have a matching import field.
If there are Field Names in the first row of the file, select the box to Exclude First Row and submit the page. Navigate to Start Page > PowerScheduler > Courses > Choose a Course > Teacher Assignments. There should be figures to indicate the presence of Assignments in that build. Note: Make sure to regenerate bitmaps under PowerScheduler > Functions > Regenerate Bitmaps after importing any preschedule, room free, teacher free, course restrict constraints or any settings that use an expression.
Permanently Store Grades
在 PowerSchool 中,Permanently Store Grades 是一个重要的功能,它允许教师将学生的最终成绩永久存储在系统中。这对于生成学生的学术记录和报告卡非常重要。
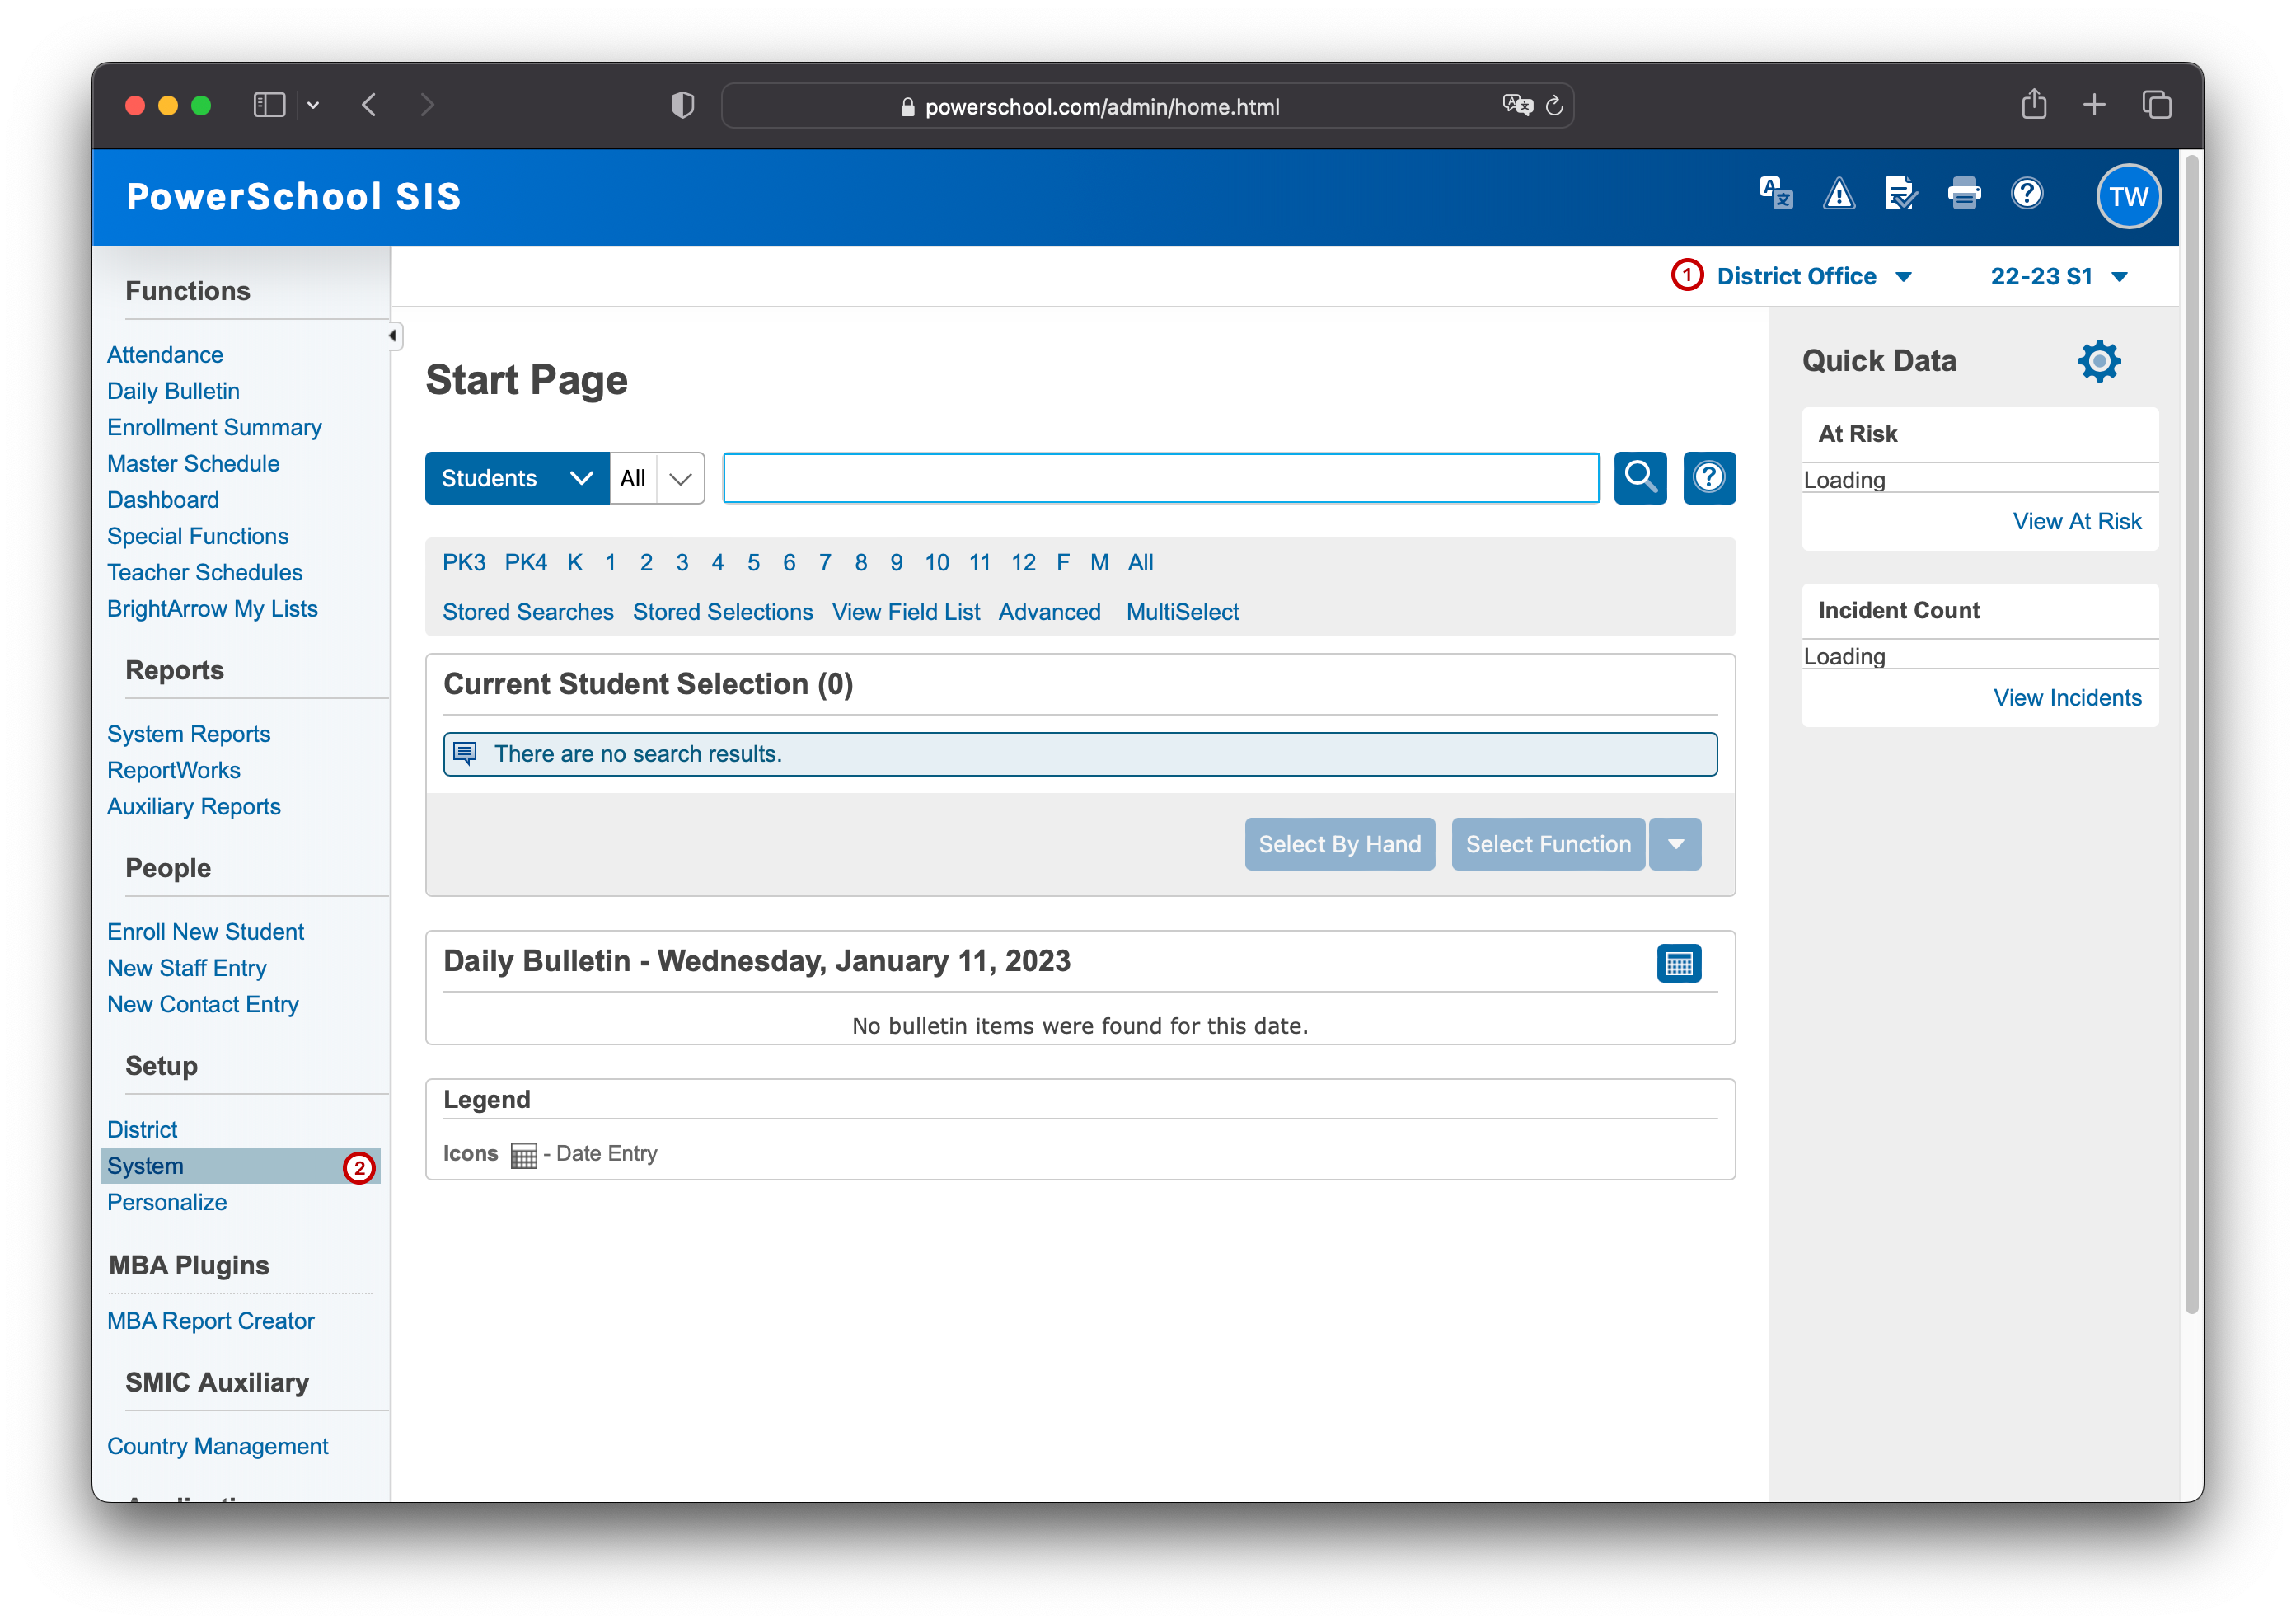
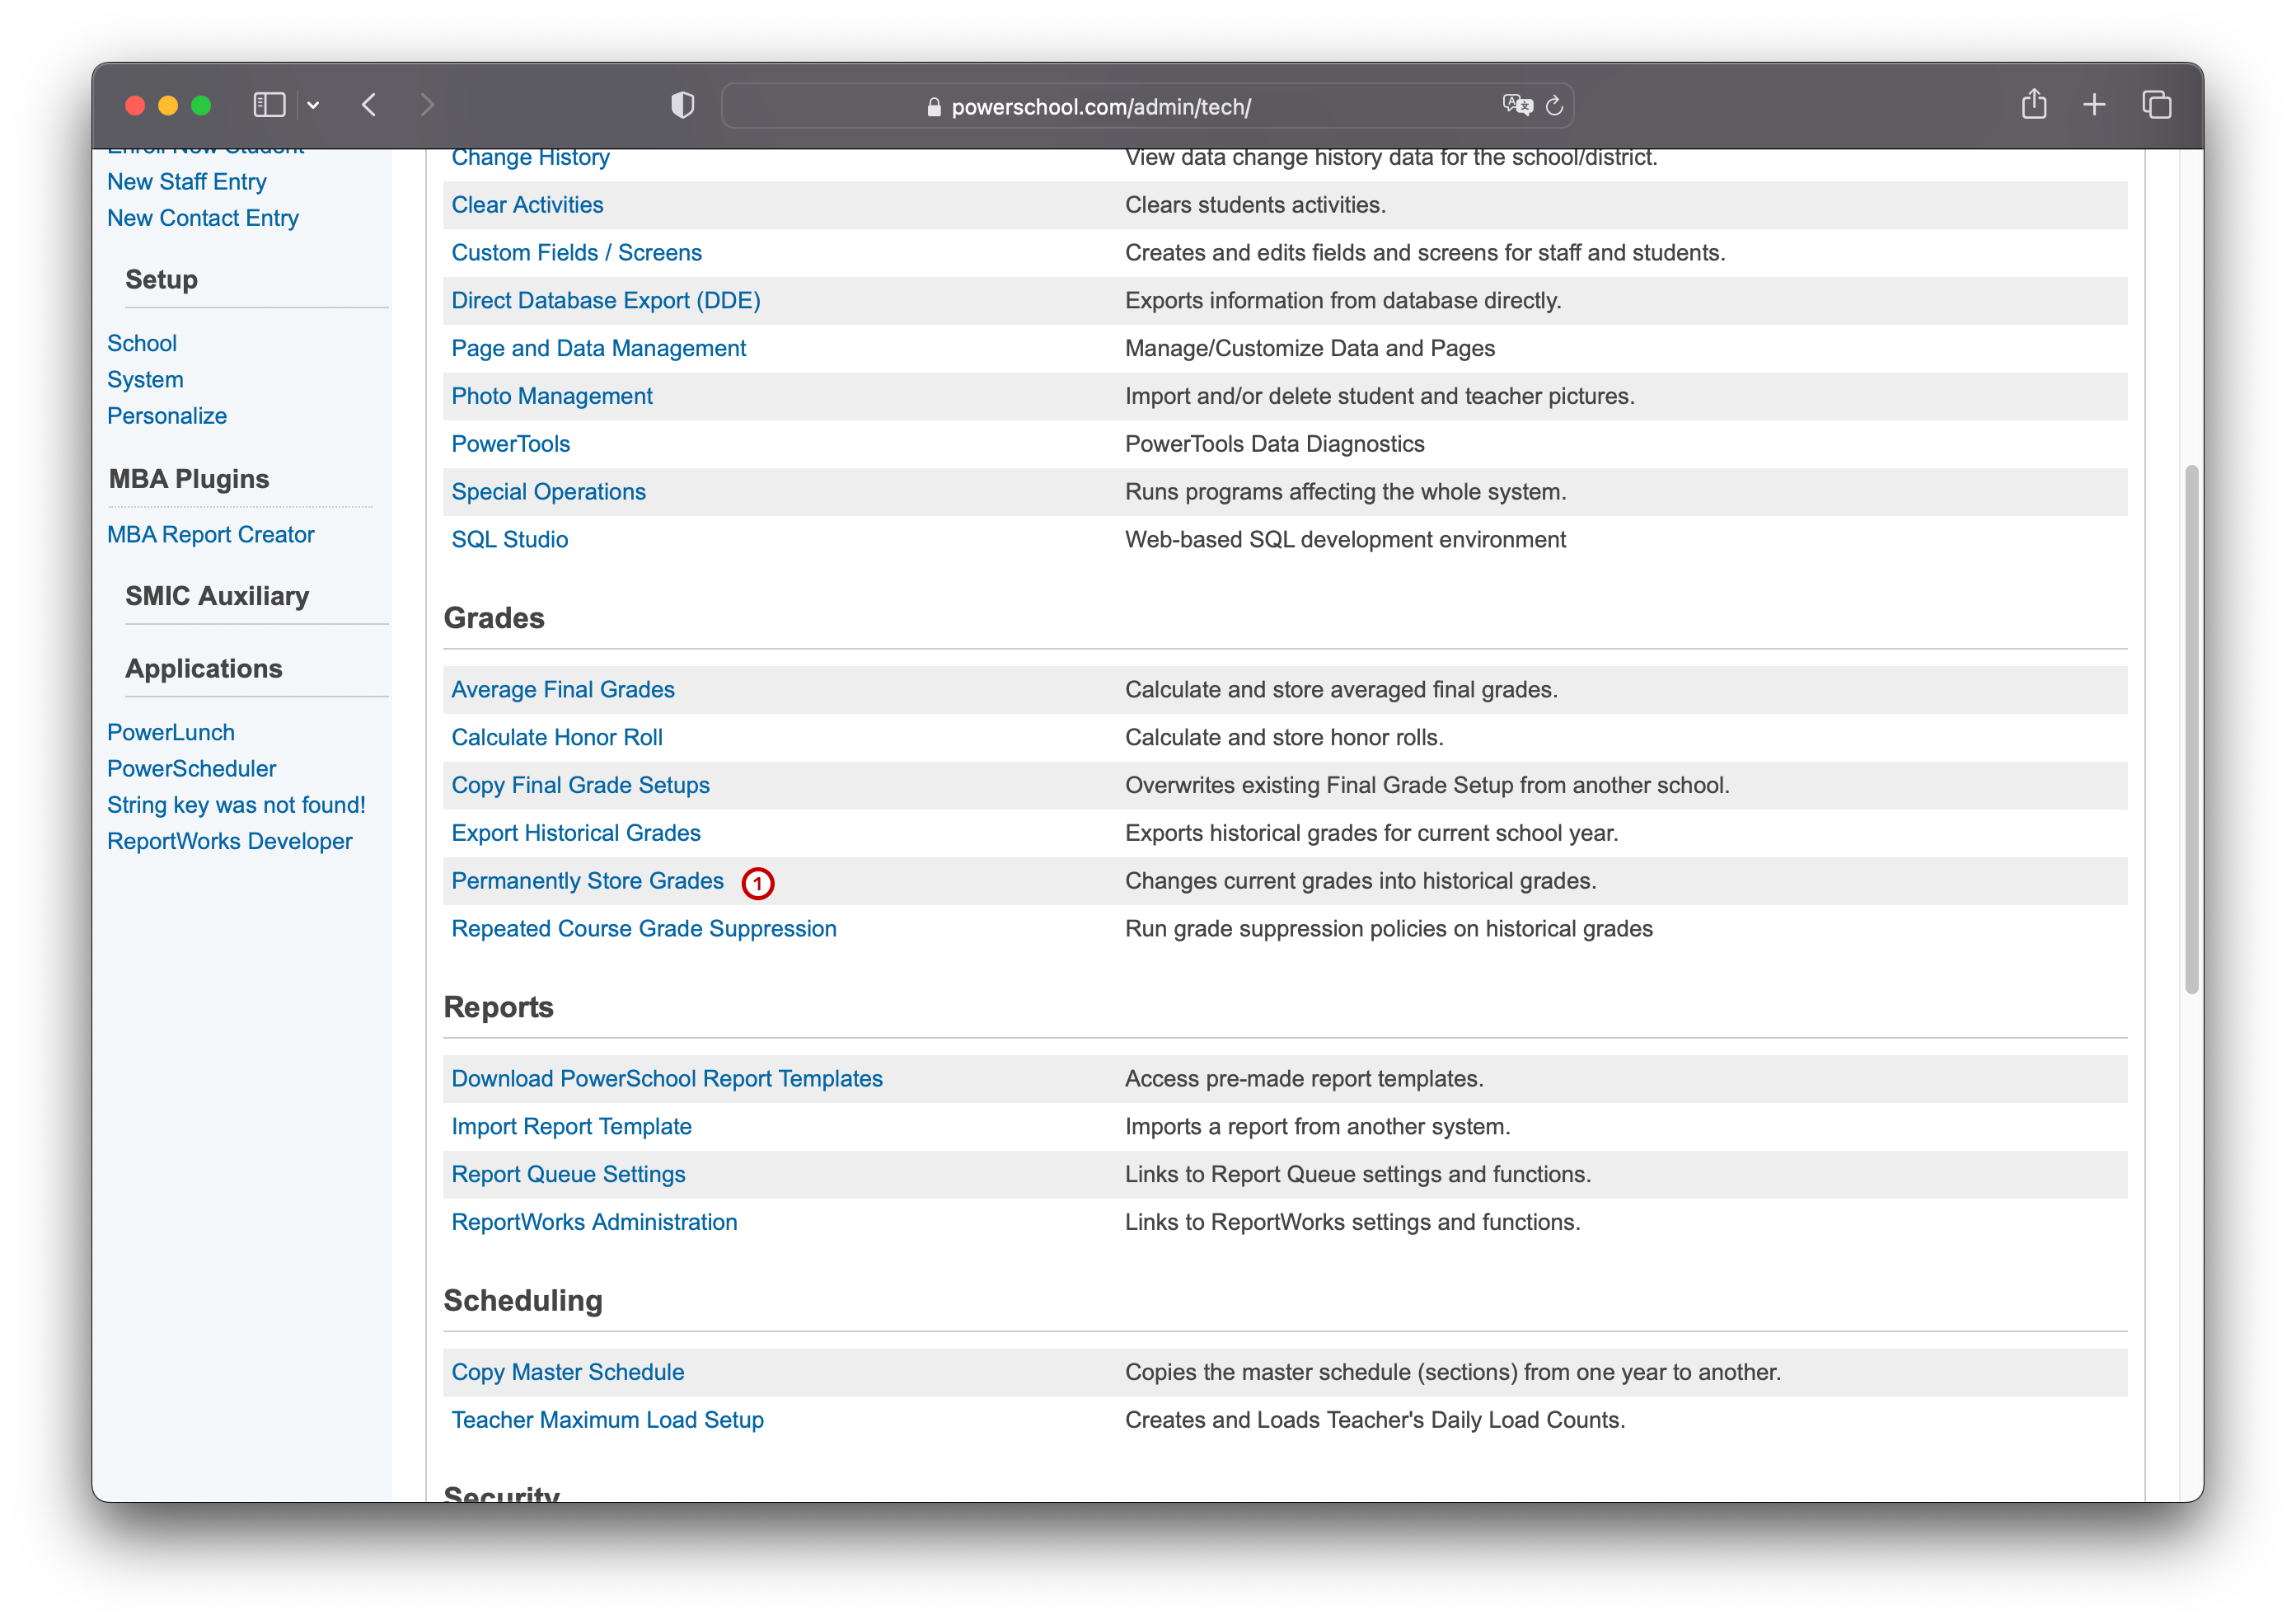
- On the start page, choose System under Setup in the main menu.
- Under Grades, click Permanently Store Grades.
PowerSchool API
入口文件
PS 插件的开发过程,第一步就是创建一个 plugin.xml 文件,该文件定义了插件的基本属性,例如:
- 插件的名称
- 版本
- 插件功能描述
- 是否支持 OAuth
- OpenID 相关设置
- SAML 相关设置
- 访问权限设置
- 数据访问请求
- 资源访问
- 事件
- 插件发布人信息
现在我们开始编写入口文件,推荐使用 VSCode 或 Sublime Text 编辑器,本示例使用 VSCode,如图:
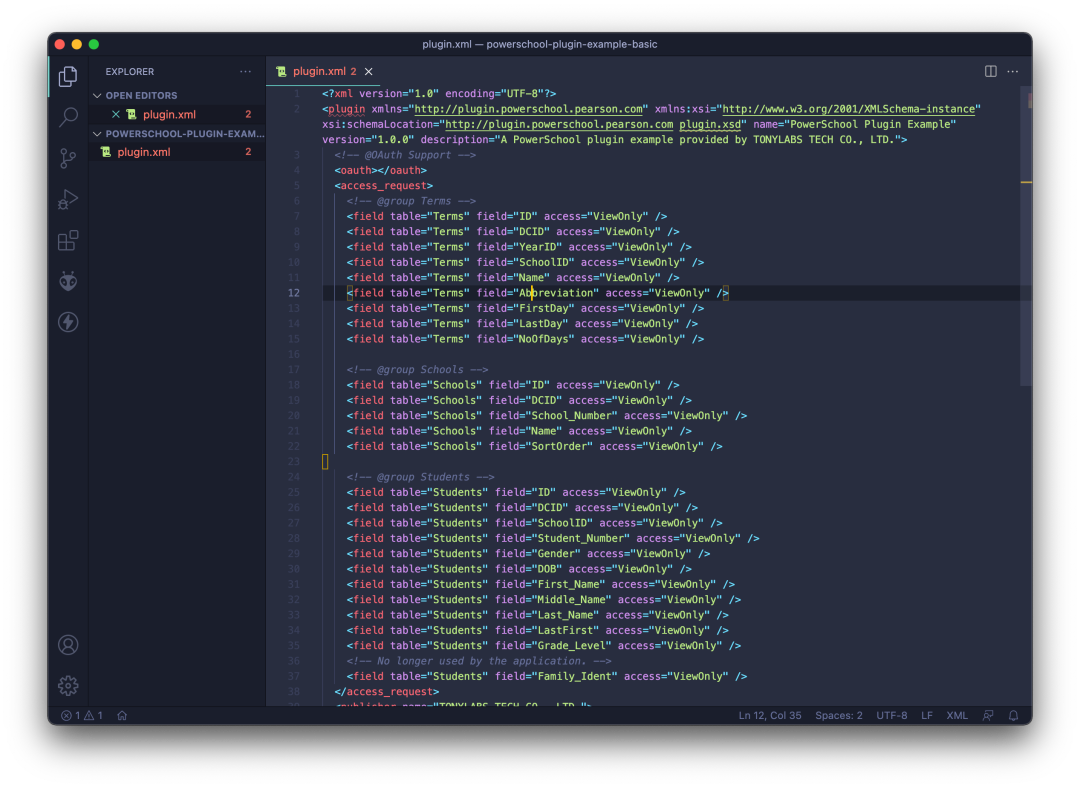
复制以下代码,并保存为 plugin.xml 文件。该代码示例首先请求开启 OAuth 支持,并请求授权该插件以只读方式访问 Terms、Schools 和 Students 表中的部分字段。注意这里是 ViewOnly,任何通过该插件访问的数据,都是不能修改原数据的,不必担心插件造成影响。
<?xml version="1.0" encoding="UTF-8"?>
<plugin xmlns="http://plugin.powerschool.pearson.com"
        xmlns:xsi="http://www.w3.org/2001/XMLSchema-instance"
        xsi:schemaLocation="http://plugin.powerschool.pearson.com plugin.xsd"
        name="Basic Data Access Plugin"
        version="1.0"
        description="Basic Data Access Plugin">
    <oauth></oauth>
    <publisher name="TONYLABS TECH CO., LTD.">
        <contact email="developer@tonylabs.com"/>
    </publisher>
</plugin>
获取 Client ID 和 Client Secret
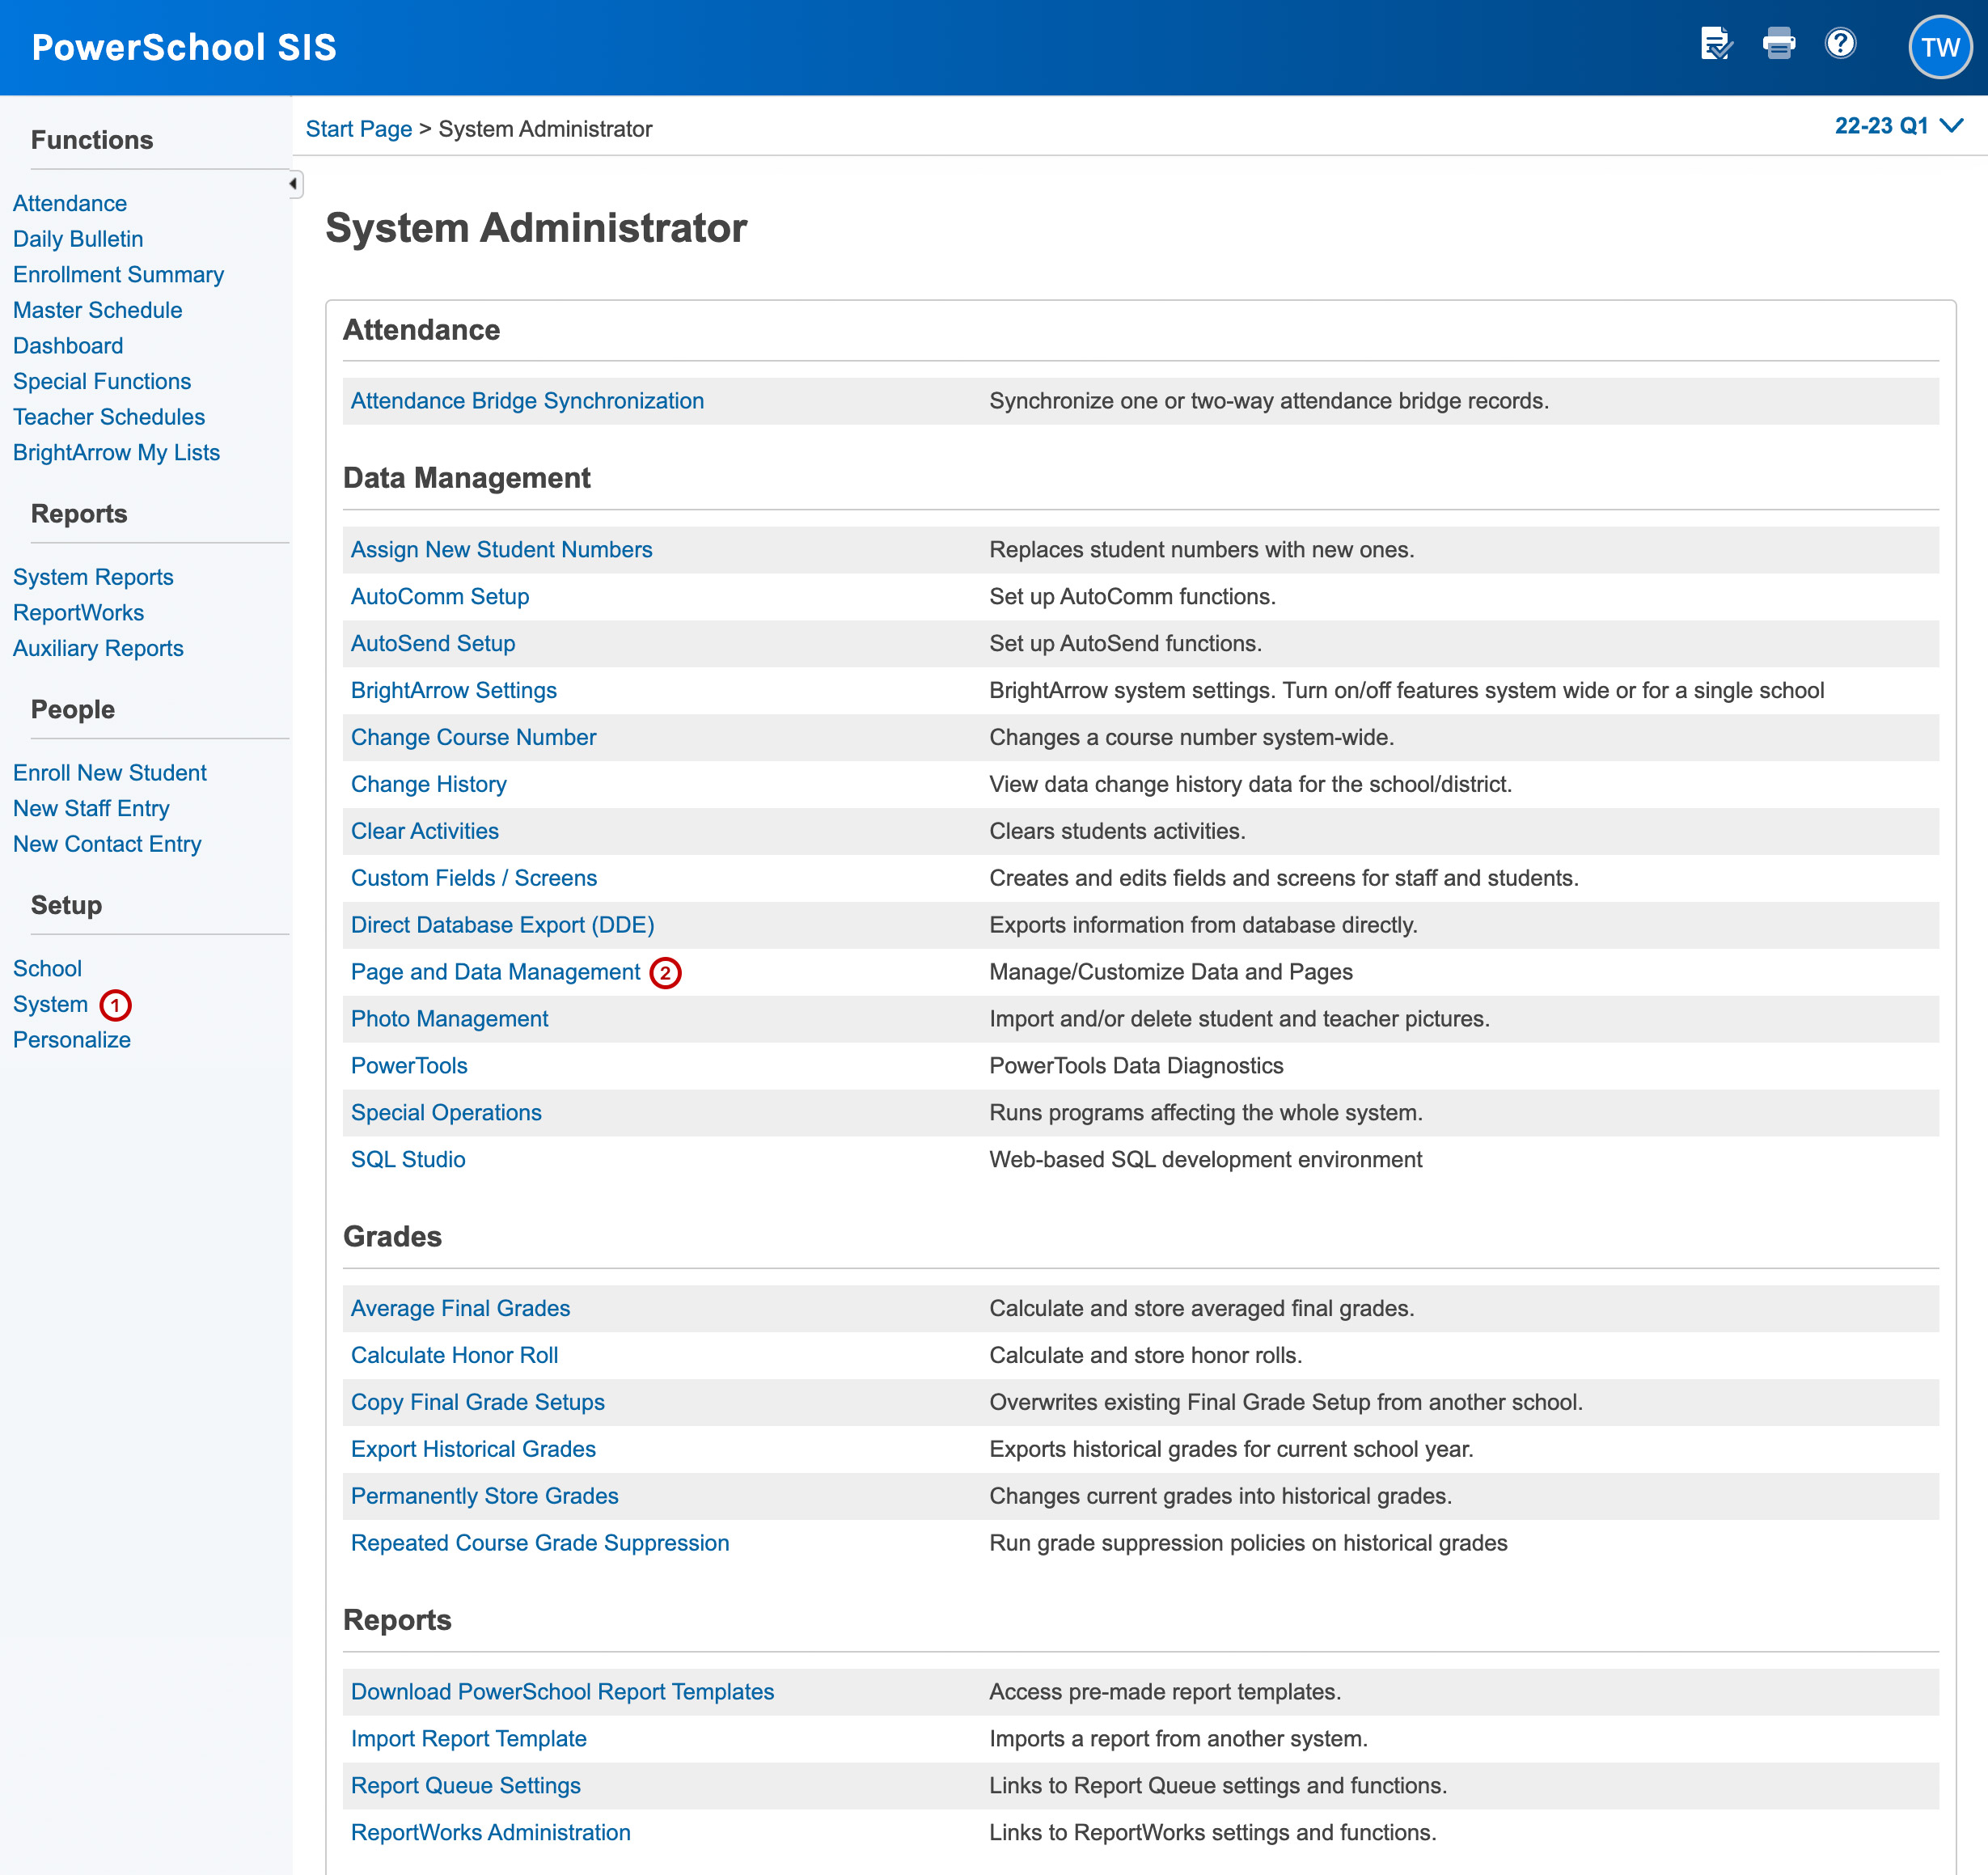
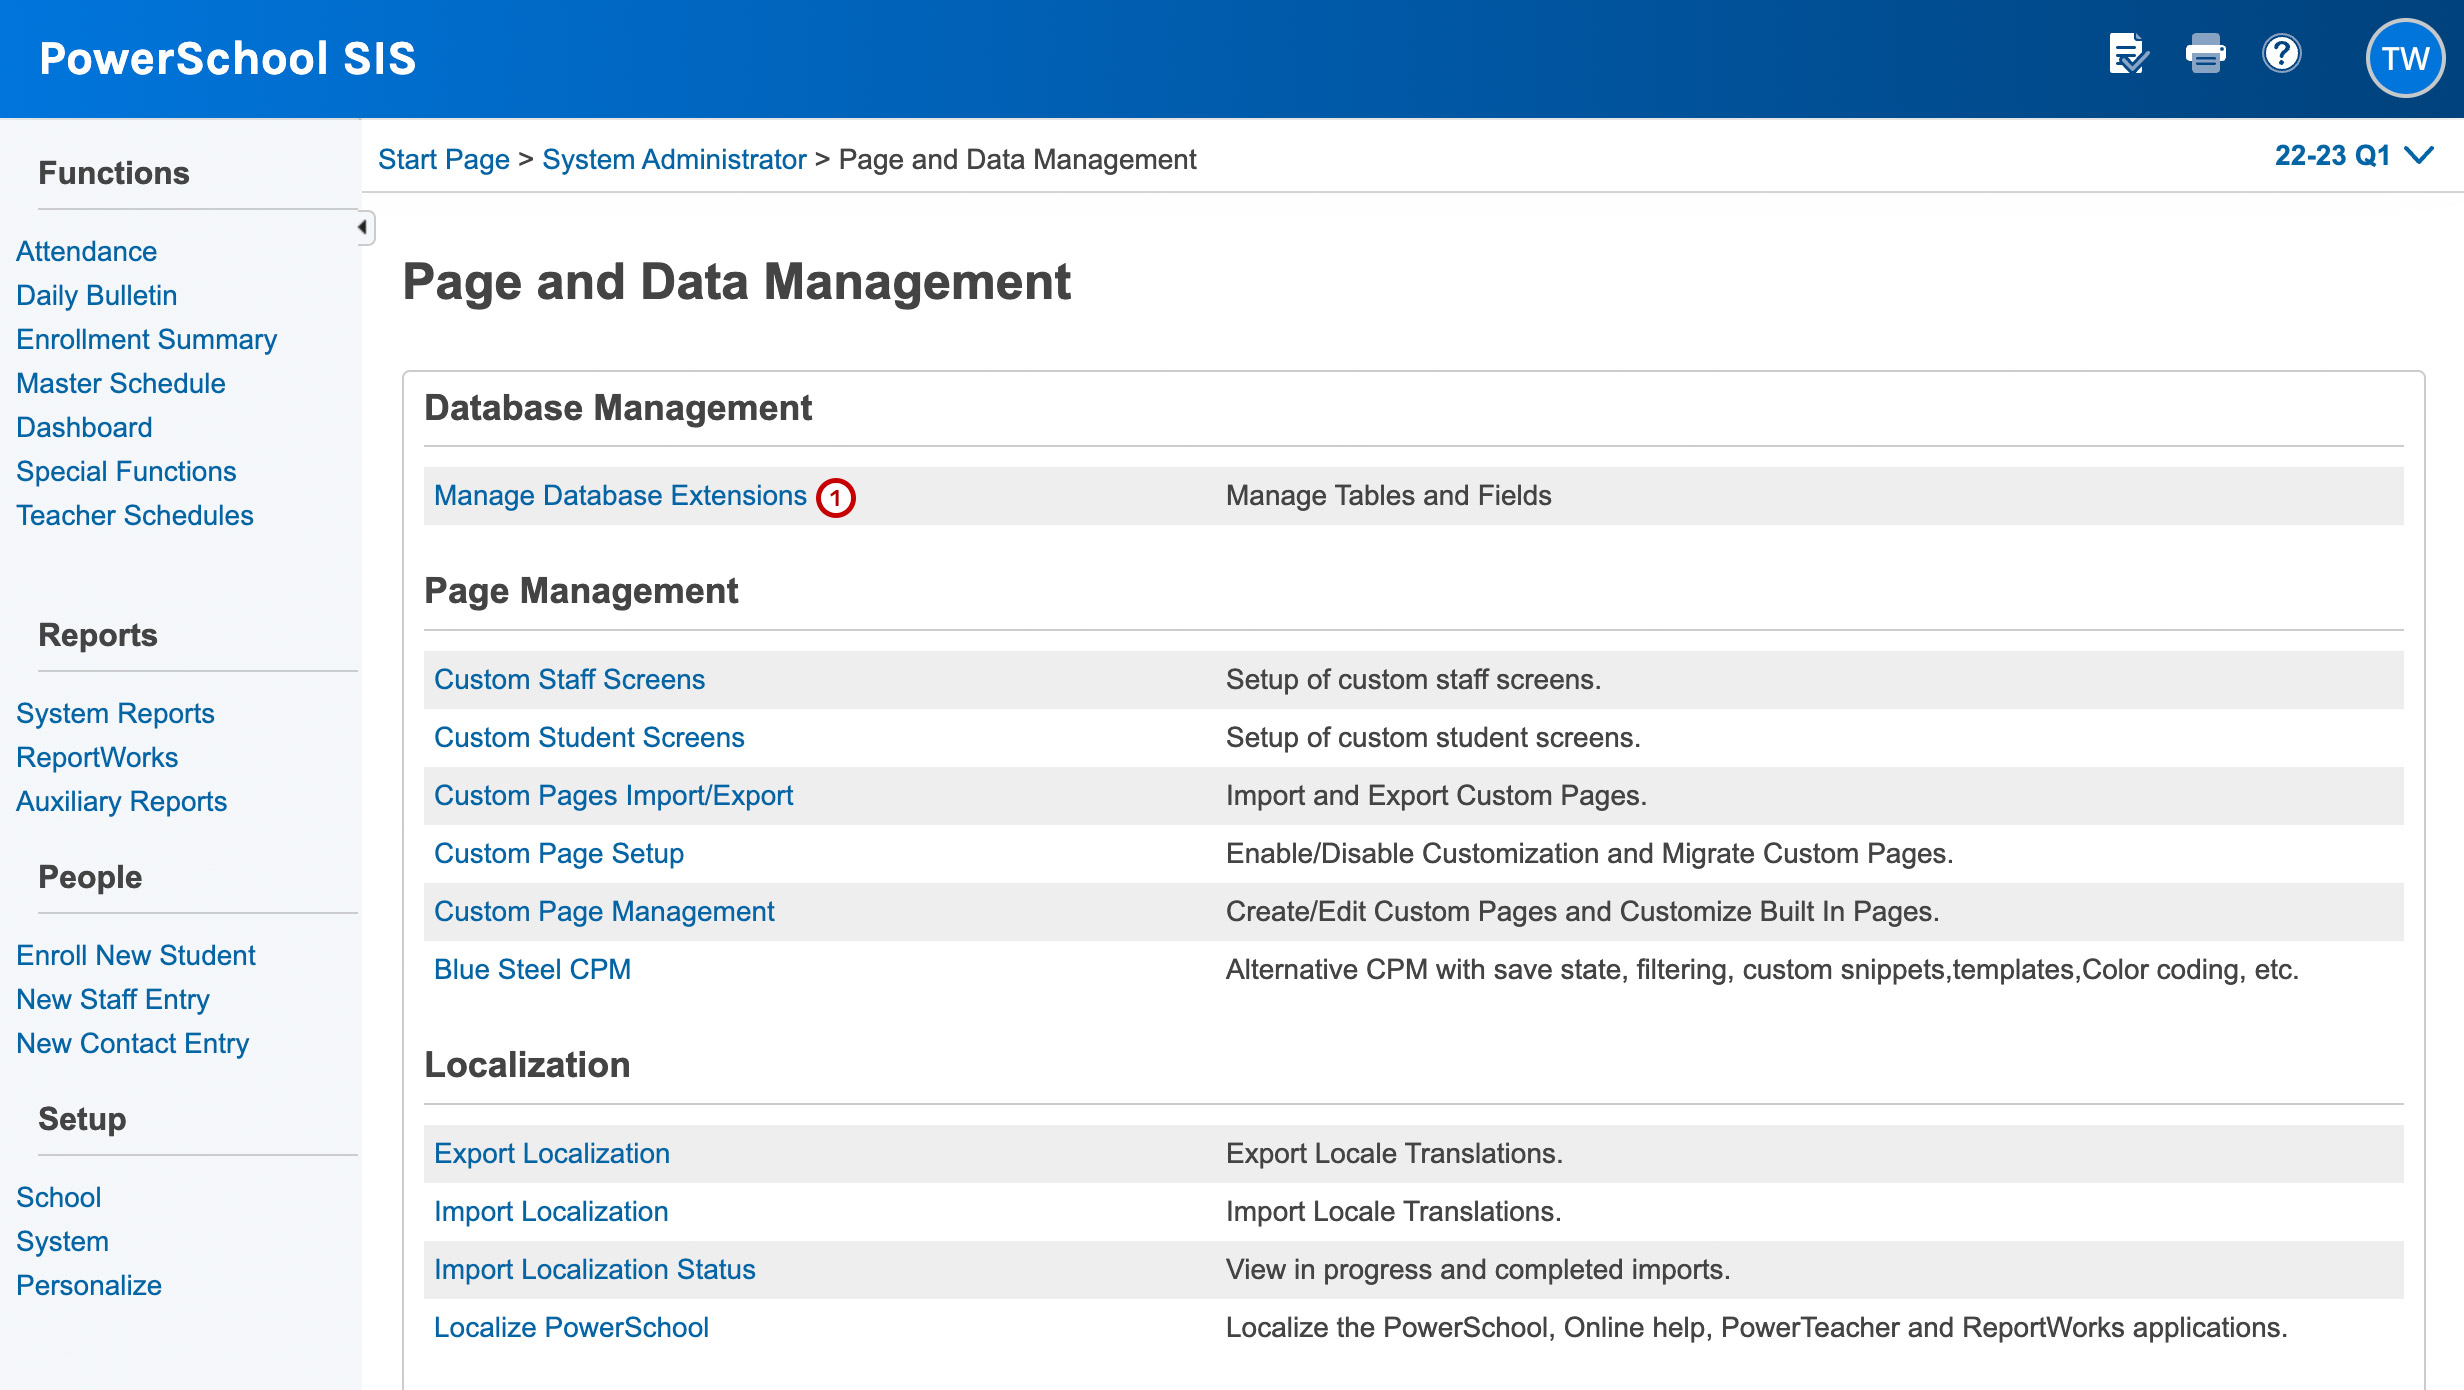
- System > System Settings > Plugin Management Dashboard > {Your Plugin}
获取 Access Token
- Take the Client ID and Client Secret and concatenate them together as follows:
{client_id}:{client_secret}
- Base64 encode the concatenated string.
- Invoke the following API endpoint to get the access token:
URI: https://{powerschool_server}/oauth/access_token/
Method: POST

Headers:
Authorization: Basic MjgxNjg3ZGMtM2MwZC00YzU3LTg5ZWQtODAzNzhiNDVhNGQ3OmQ5YmVjZjg4LTVlZmEtNDg1Yi1hYzQ4LTJhMzcxOWFlMzVkZQ==
Content-Type: application/x-www-form-urlencoded;charset=UTF-8

Body:
grant_type=client_credentials
- The response will have the following structure:
{
	"access_token": "119628ce-1734-45c8-9ac1-cf91e51f85e2",
	"token_type": "Bearer",
	"expires_in": "2592000"
}
Permission Mapping
Permission Filename
- The permission mapping file must be placed in the following folder:
permissions_root - The file must be named
[name].permission_mappings.xml
Permission Entries
<permission_mappings>
    <permission name='/admin/student/studentattendance.html'>
        <implies allow="post">/ws/schema/query/com.pearson.core.attendance.daily_attendance</implies>
        <implies allow="post">/ws/schema/query/com.pearson.core.attendance.meeting_attendance</implies>
    </permission>
    <permission name='/admin/faculty/staffschedule.html'>
        <implies allow="post">/ws/schema/query/com.pearson.core.teachers.term_schedule</implies>
        <implies allow="post">/ws/schema/query/com.pearson.core.teachers.term_sections</implies>
    </permission>
</permission_mappings>
The example above gives users that have access to the studentattendance.html page access to these following PowerQueries:
- com.pearson.core.attendance.daily_attendance
- com.pearson.core.attendance.meeting_attendance
And it gives users that have access to the staffschedule.html page access to these following PowerQueries:
- com.pearson.core.teachers.term_schedule
- com.pearson.core.teachers.term_sections
Note that many pages and many permissions can be declared in a single file.
Please also note the "allow" attribute. This is generally necessary when you are mapping PowerQueries. See the next section for more information.
The "allow" Attribute
You may have noticed the "allow" attribute in the above permission mappings. It is technically optional, but you will want it in many cases, especially when mapping PowerQueries. Why?
The purpose of permission mappings is to allow PowerSchool to map page permissions to resource permissions. There are four levels of page permission - No Access, View-Only, Read-Write, and Mod Access. Similarly, there are a number of HTTP verbs: GET, POST, PUT, and DELETE being the main ones. By default, PowerSchool will map these as follows:
| Page Permission | HTTP Verb |
|---|---|
| No Access | N/A |
| Read Only | GET |
| Read Write<br>Mod Access | GET, POST, PUT, DELETE |
In other words, if the user has Read Only access to the page being mapped from ("/admin/student/studentattendance.html" in the example above), PowerSchool will allow only the GET verb on the resource URIs listed. (The rationale for this is that GET is normally a read-only verb, while POST/PUT/DELETE are generally read-write verbs.) However, if you give the " allow" attribute, this will also grant permission to the named verb. Thus, a mapping with allow="post" will allow the GET and POST verbs, even if the user only has read-only page permission to the named page.
Because of this, it is normal to see PowerQueries mapped with allow="post", since PowerQueries are always invoked with a POST verb, despite being a read-only mechanism. If you don't the user will only be able to invoke the PowerQuery if they have read-write access to the mapped page.
Mappings by Portal
You need to map differently depending on which portal/user type you are doing the mapping for.
| User Type | Page Name to Use |
|---|---|
| ADMIN | /admin/**/*.html (don't use asterisks, use the actual page name. Additionally, don't use a page all users have access to unless the intended audience is everyone) |
| PARENT | /guardian/home.html |
| STUDENT | /student/home.html (note that this is not an actual page name) |
| TEACHER | /teachers/home.html |
For Extension Table Queries
The following is an example of permission mapping that grants a plugin access to Table Queries against the extension tables. The example grants access to use each of the distinct operations that are available. A distinct operation is a combination of the path and the operation type, such as get.
<permission_mappings>
    <permission name='/admin/students/activities.html'>
        <implies allow="get">/ws/schema/table/activities</implies>
        <implies allow="get">/ws/schema/table/activities/#</implies>
        <implies allow="get">/ws/schema/table/activities/count</implies>
        <implies allow="post">/ws/schema/table/activities</implies>
        <implies allow="post">/ws/schema/table/activities/massupdatebycriteria</implies>
        <implies allow="put">/ws/schema/table/activities/#</implies>
        <implies allow="delete">/ws/schema/table/activities/#</implies>
    </permission>
</permission_mappings>
Note that this example grants access based on a user's access to a specific path. Multiple permission mappings can be added for unique paths. Also note that the # characters are used to indicate a numeric value when invoking the endpoint. Do not use the # character in your plugin code, use the ID of the record instead.
Permission Error
If you invoke a resource within a PowerSchool portal without an appropriate permission mapping defined, you will receive a 403 Forbidden status code with a body similar to the following:
{
    message: "You do not have POST permission on the resource /ws/schema/query/com.pearson.core.attendance.daily_attendance"
    errors: [0]
}
Power Query
The PowerQuery filename must follow this format:
[name].named_queries.xml
The PowerQuery file may contain multiple named queries. The name could represent a group of or a set of related queries. Multiple physical PowerQuery files may also be created. All the files must be included in a . Here's an example of a simple PowerQuery file with a single PowerQuery defined:
<queries>
  <query name="com.mycompany.mydivision.students.get_last_name">
    <columns>
      <column column="students.first_name">aliasstudents.aliasfirstname</column>
    </columns>
    <sql><![CDATA[
       select first_name from students
    ]]></sql>
  </query>
  <!-- Define more queries here -->
</queries>
Though you can place only one or hundreds of PowerQueries in a single file, it is generally considered best practice to group PowerQueries together. So, if you need a set of queries for attendance, student info, and grades, you might want to have three files with the queries places in their respective files.
A note on naming: it is important that both the PowerQuery name and the file name be unique across the entire system. Both the file name and the query name are a single, flat namespace. Thus, it is highly recommended to use a file name like com.powerschool.attendance.named_queries.xml rather than just attendance.named_queries.xml so as not to conflict with other people writing attendance-related queries.
Query
搜索运算符
PowerSchool 在插件中查询数据,需要使用 PowerSchool 规定的特殊查询符号:
| 操作符 | 描述 |
|---|---|
| == | 等于 |
| =gt= | 大于 |
| =ge= | 大于或等于 |
| =lt= | 小于 |
| =le= | 小于或等于 |
| ; | 布尔(仅用于 between 表达式) |
| * | 泛符号(可用于字符串结尾) |
PowerSchool SIF Agent
PowerSchool SIF Agent 是一个用于 PowerSchool SIS 的插件,它允许 PowerSchool 与其他系统集成,以便共享数据。SIF 代理允许 PowerSchool 与其他系统进行实时数据同步,这对于学校和学区来说是非常有用的。
安装 SIF 代理
- 下载 SIF 代理插件
- 将插件上传到 PowerSchool 服务器
- 在 PowerSchool 中安装插件
- 配置 SIF 代理
- 启动 SIF 代理
- 测试 SIF 代理
- 部署 SIF 代理
- 监控 SIF 代理
- 更新 SIF 代理
- 卸载 SIF 代理
- 问题排查
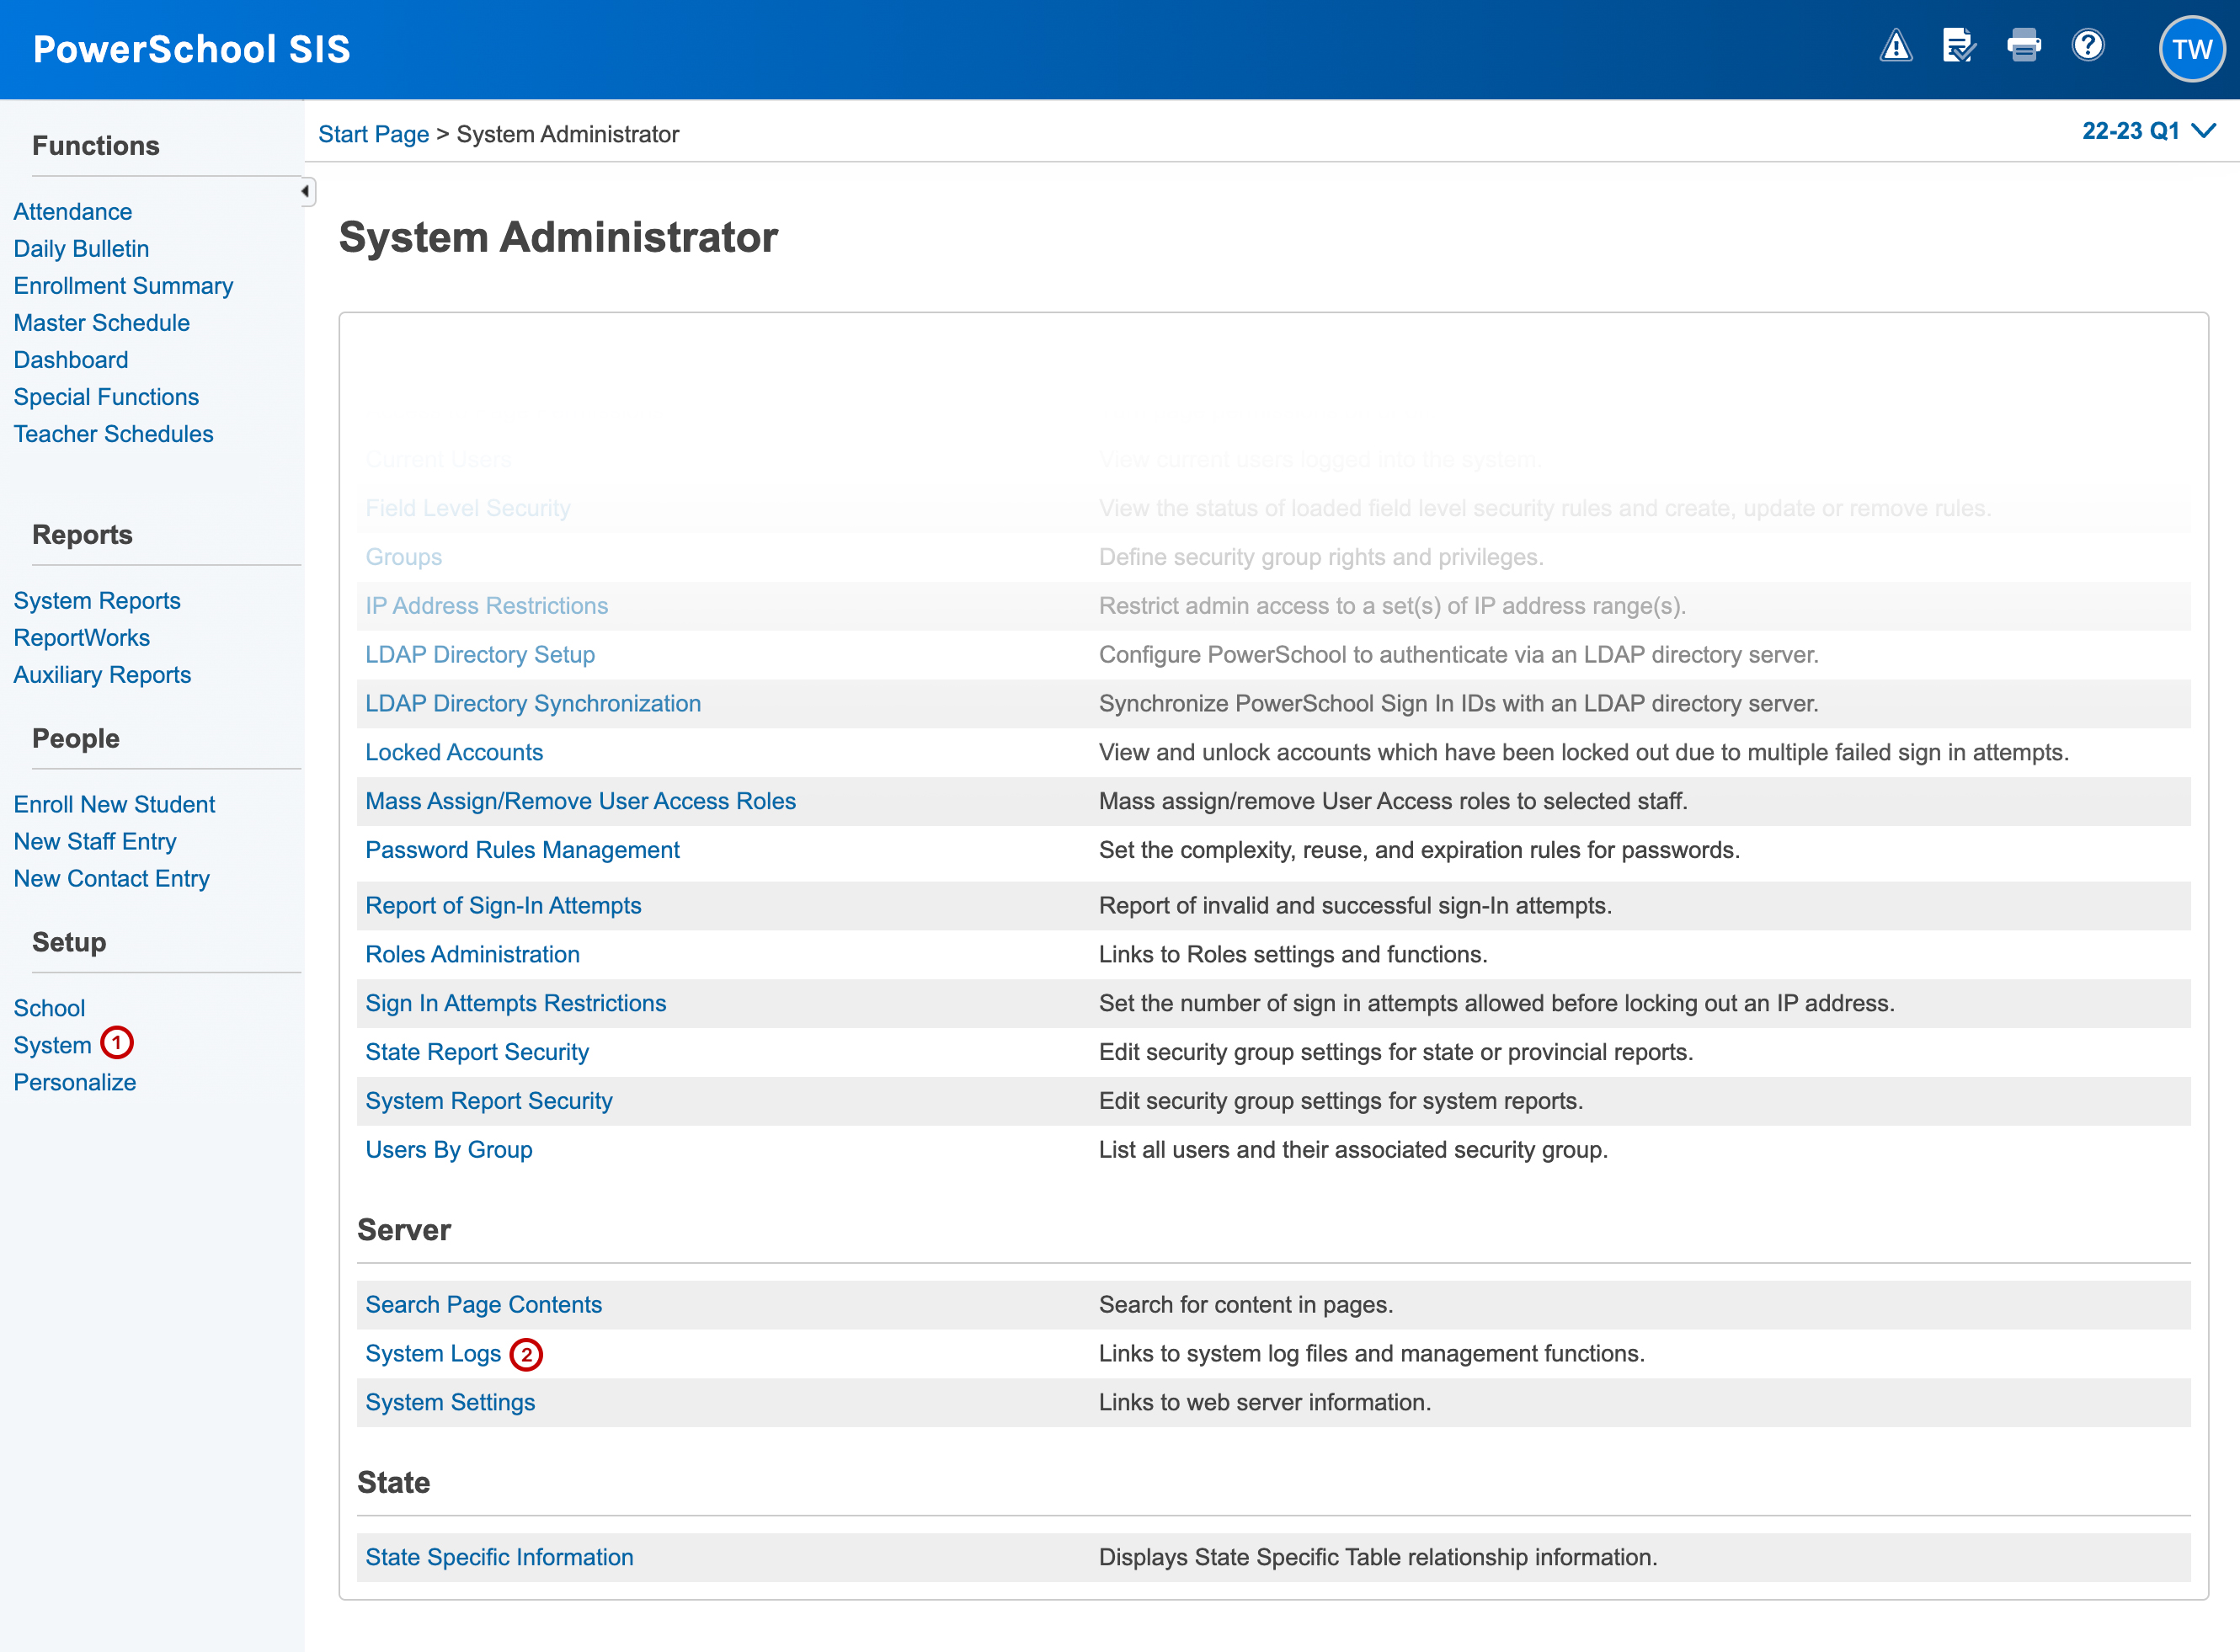
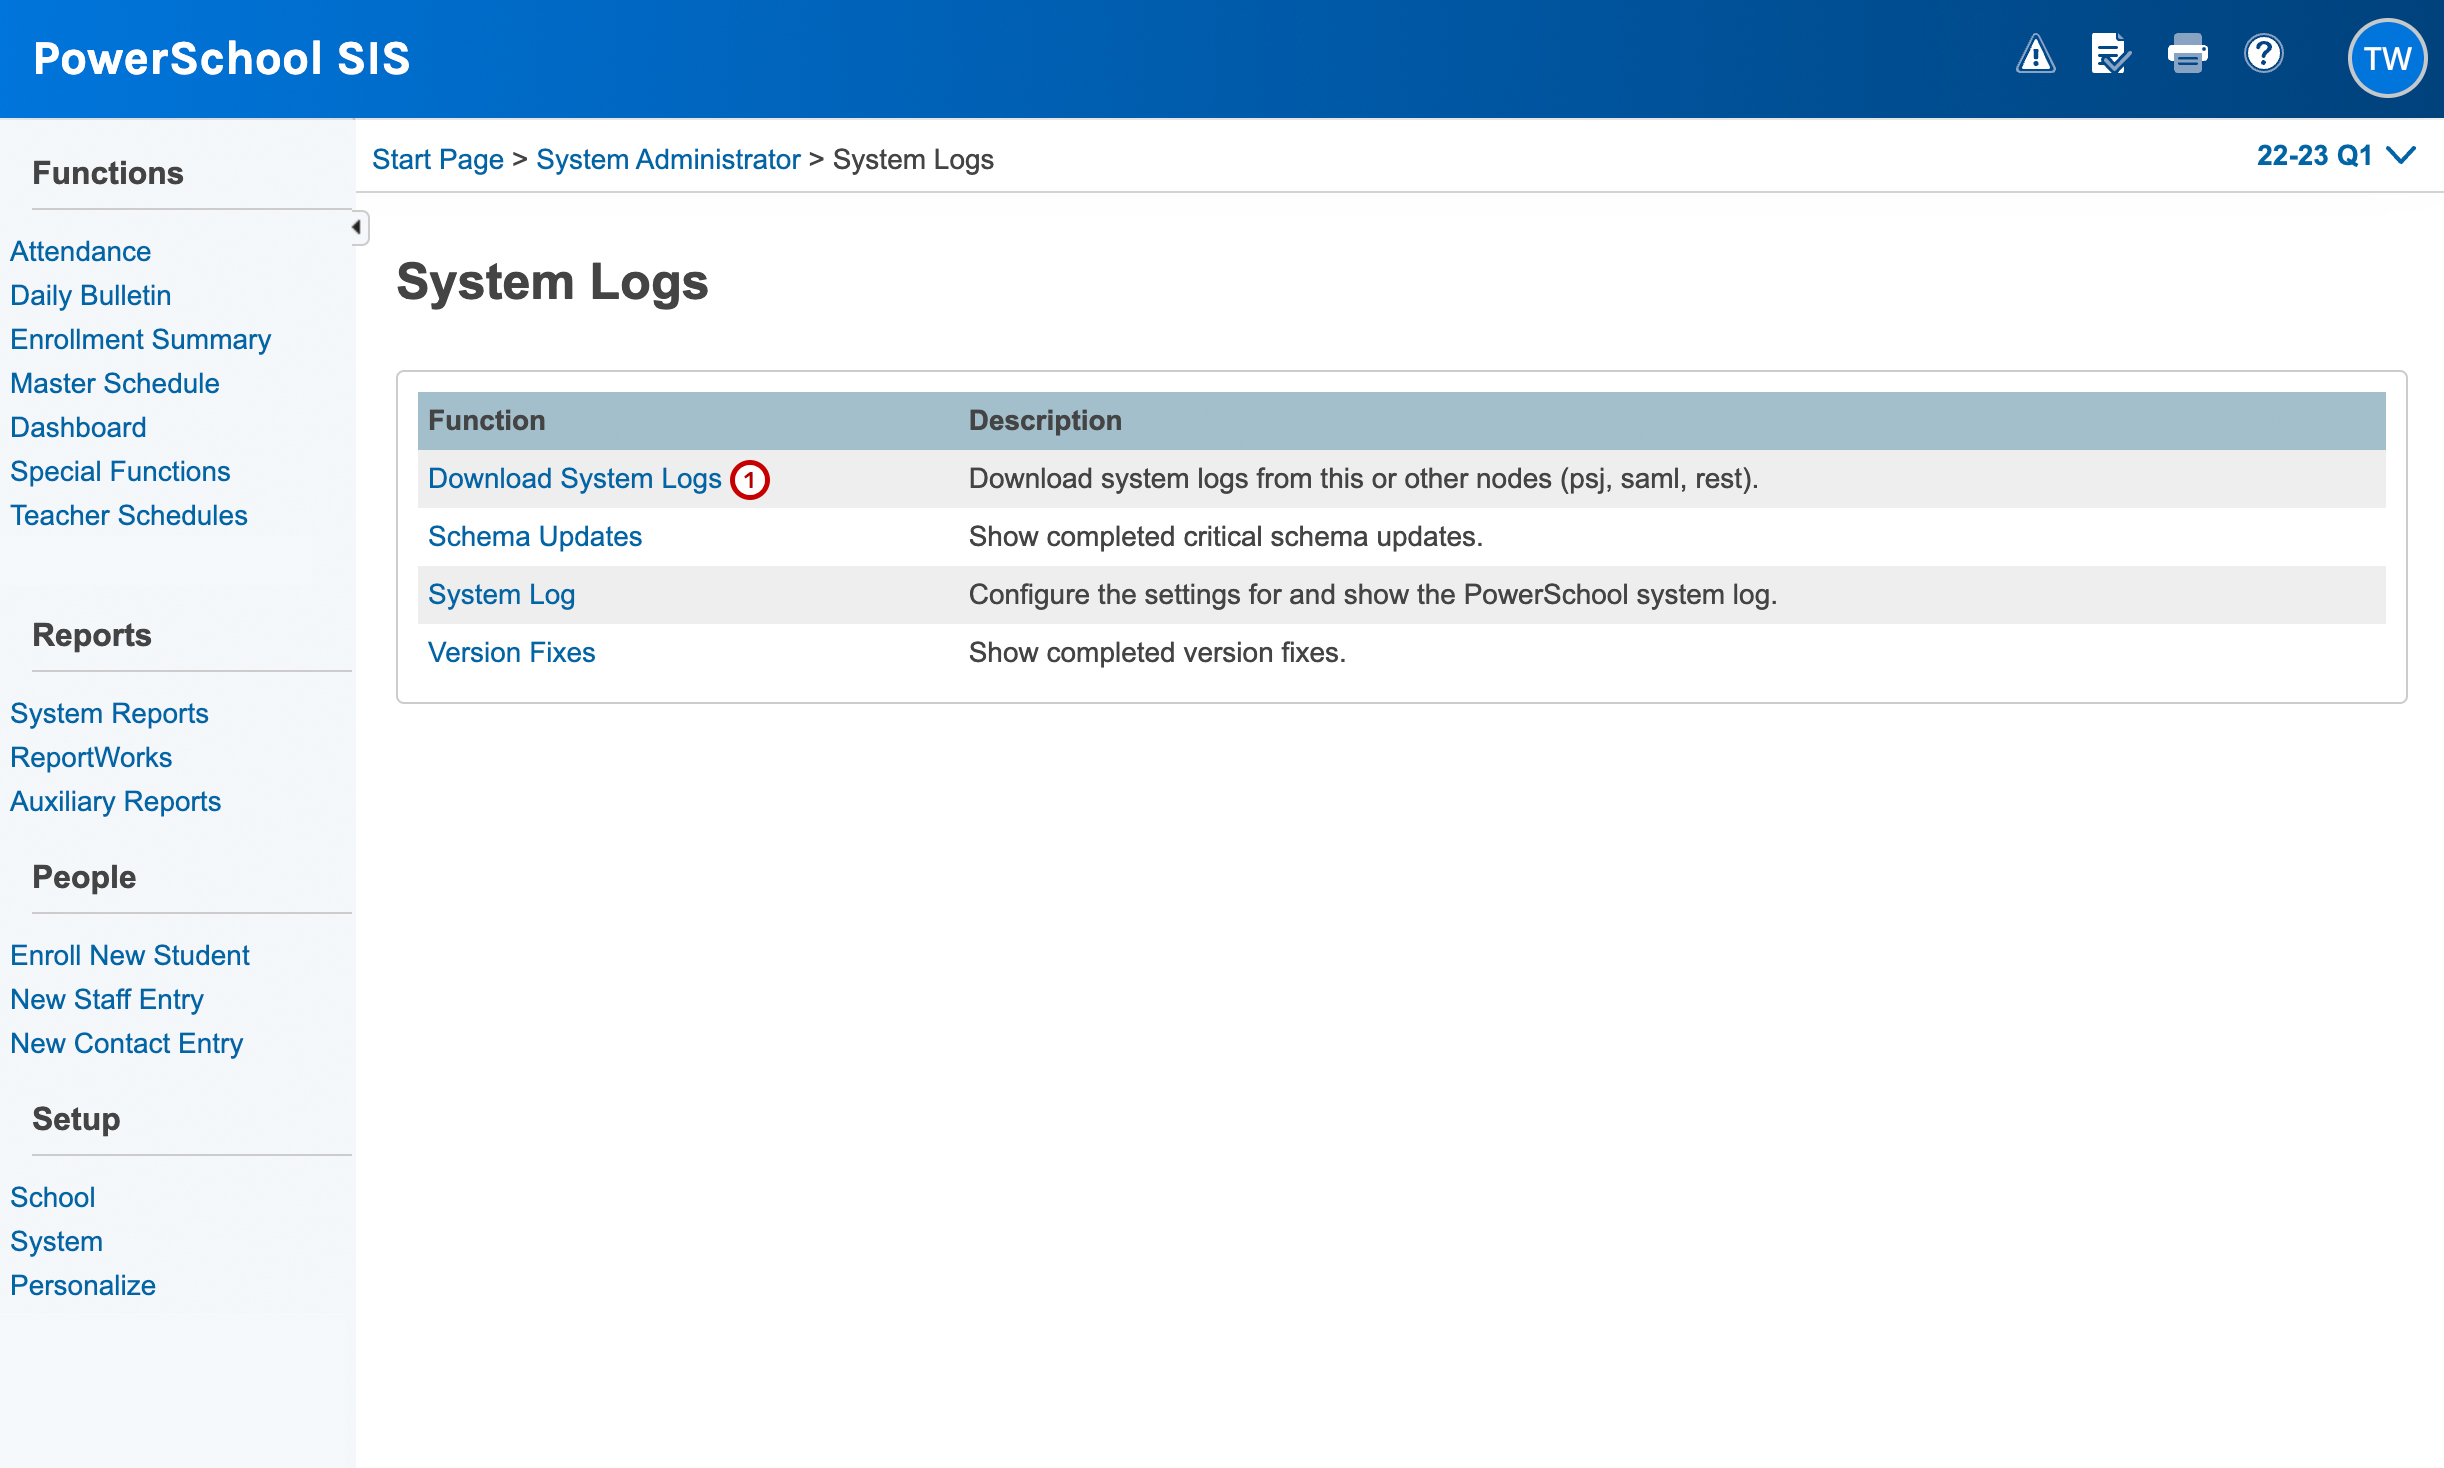
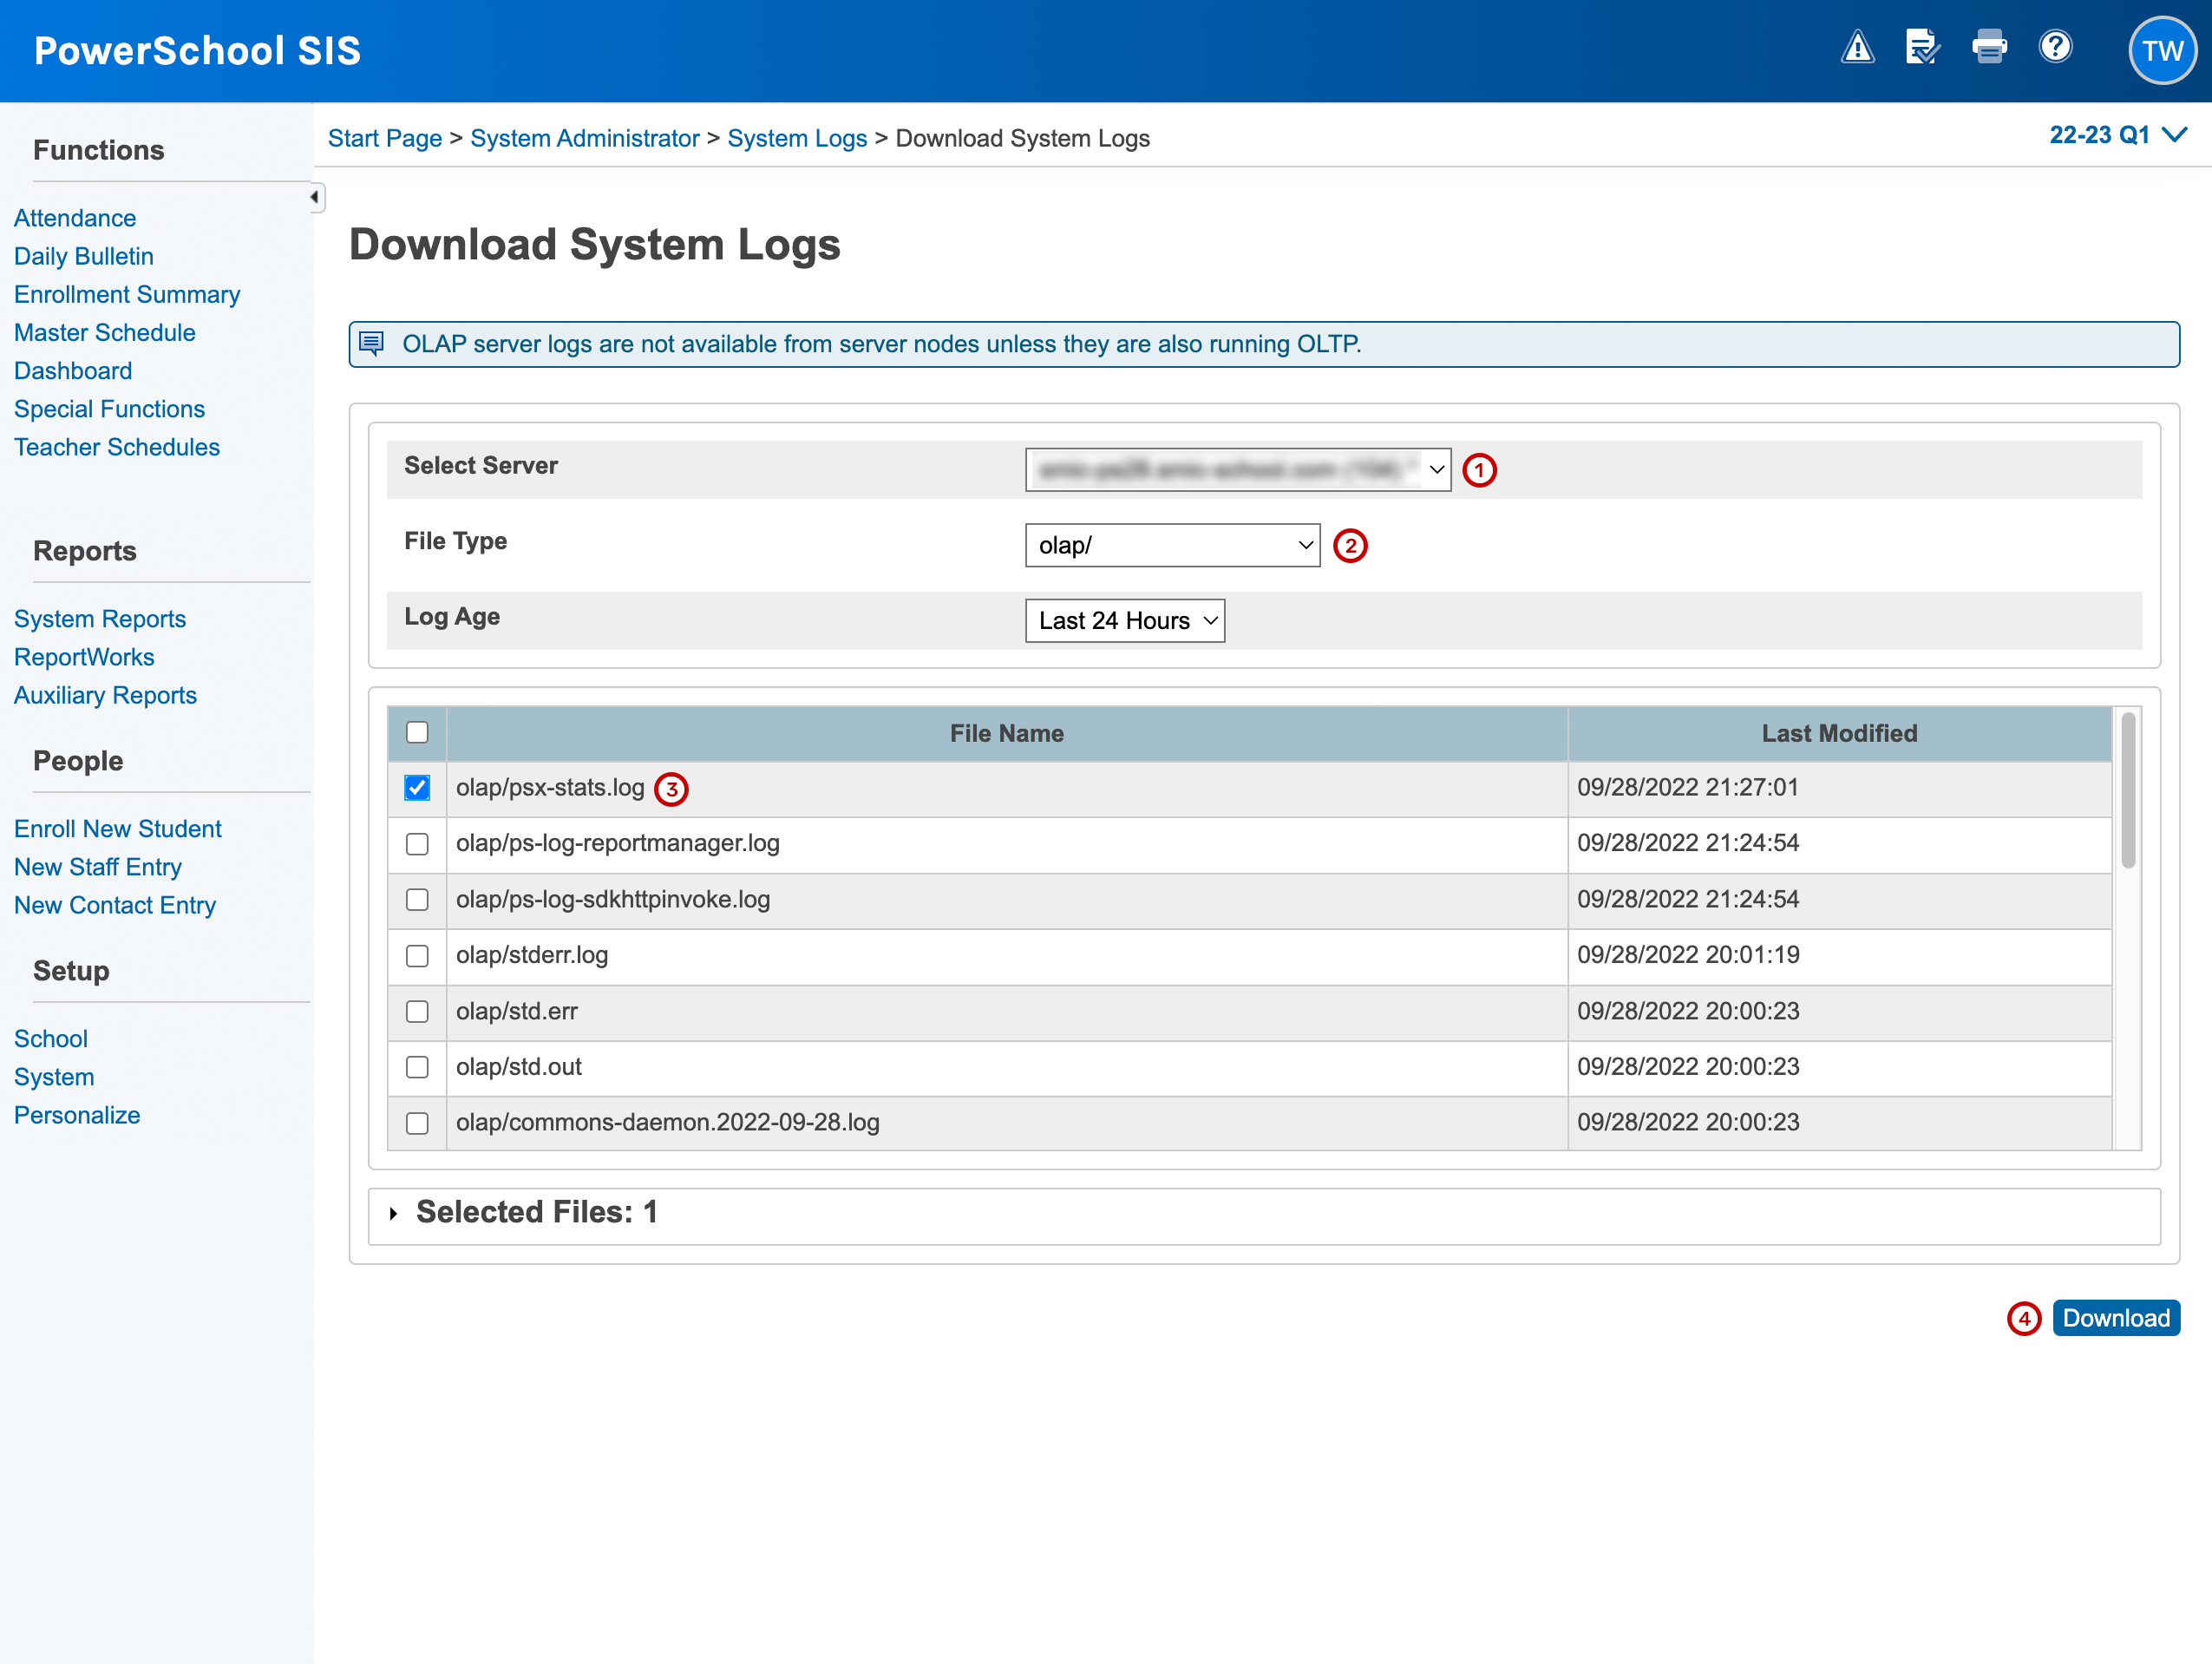
How to check system Logs
Bulk Import Photos
使用导入图片功能,您可以轻松管理学生和/或教职工的照片,快速上传或删除照片。
映射类型
在上传学生或教职工的照片之前,您需要确定映射类型。映射类型表示您将在映射文件中使用学生和教职工的编号还是姓名。按学生或教职工编号进行映射是在区级进行的。而按学生或教职工姓名进行映射是在学校级别进行的,以减少重复记录的风险。如果按学生或教职工姓名进行映射,则需要为每所学校创建单独的压缩文件和映射文件,以便上传照片。
映射文件
确定了映射类型后,您需要创建一个制表符分隔的映射文本文件。映射文件用于指定映射文件中的哪些列对应于压缩文件中的哪些照片。映射文件中包含的信息取决于您的映射类型,可以通过从学生或教师表中导出并包括适用的字段,如学生编号、教师编号、姓氏、名字等来获得。
如果使用学生或教职工编号上传学生或教职工照片,映射文件必须包含以下数据:[学生编号]或[教师编号]和[文件名]。不需要列标题。例如:
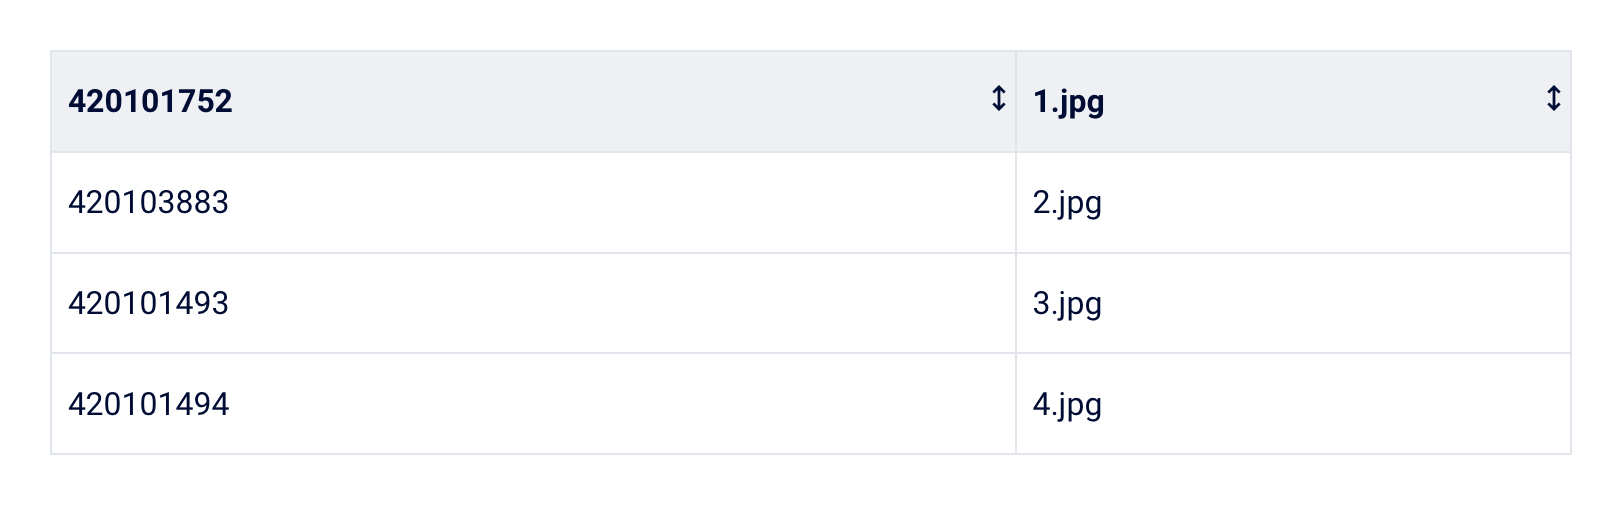
> cd folder_name
> find . -type f | sed -n 's/.*\/[0-9]*\.[^.]*$/\1/p' > numeric_filenames.csv
Page Customization
Custom Fields

Troubleshooting
Unknown Term ID Specified - PowerSchool was unable to map the TermID value to an Import File Term #
Solution
- Navigate to Start Page > School Setup > Years & Terms > Edit Terms
- Select the term you're attempting to import to.
- Verify that the Import File Term # for the term corresponds with the TermID value in the import file. (Note: The Import File Term # cannot be left blank. It will not default to the TermID value).
Absences Quicklookup 与 Transcript 不符
PowerSchool's Guardian (Parent) Email system pulls attendance data in a slightly different way from the Quick Lookup view in the PowerSchool Public and Admin Portals. The counts for meeting attendance in the email come from the current absence and CurrentTardies fields on the student's CC records.
Solution
To troubleshoot reports of inaccurate attendance counts in parent emails, perform the following steps: Switch to the school and select the year-long term in the Term Picker Search for the affected student Navigate to the student's Quick Lookup Note the Attendance and Tardy values on their Quick Lookup page Navigate to the Teacher Comments page Note the number at the bottom of the page Return to the Start Page and click System under Setup Click Direct Database Export (DDE) Select the CC table Search for the following terms: StudentID = <number noted from teacher comments> TermID >= 2800 (or the current year's TermID, 2800 = 18/19 year, 2900 = 19/20 year, etc.) Click Search all ### records in this table Click Table View and examine each record's Current Absences, and compare them to the corresponding value noted from Quick Lookup, if any of the values differ, the CC records have become de-synchronized from the attendance counts. These records will occasionally get out of sync with Quick Lookup, so in order to correct these counts, perform the following steps:
From the Start Page in a School, click System under Setup
Click Special Operations In the Operation drop-down, select Recalculate Attendance Click Submit Note: You will not need to enter any values into the parameter or code fields when working with the current year.
Once the Special Operation completes, return to DDE to view the CC records that had the mismatch. If the CC records continue to not match the Quick Lookup count, please reach out to PowerSchool Technical Support for further troubleshooting.
Server Message: IO Error: The Network Adapter could not establish the connection
- Open services and make sure that the OracleOH19000TNSListener service is running.