Hardware
NVIDIA Jetson
What is NVIDIA Jetson series?
The NVIDIA Jetson series is a range of embedded computing boards that are designed for edge computing applications. They are powered by NVIDIA GPUs and are capable of running deep learning models and AI algorithms at the edge. The Jetson series includes the Jetson Nano, Jetson Xavier NX, and Jetson AGX Xavier.
Specifications
- Jetson Orin Nano: DC_IN 7~19V, Max Current (A) 4.2A@19V.
Firmware
Install jetson-stats to check JetPack version and GPU information.
sudo pip3 install -U jetson-stats
sudo reboot
jtop
Install Jetson Linux with JetPack
Windows
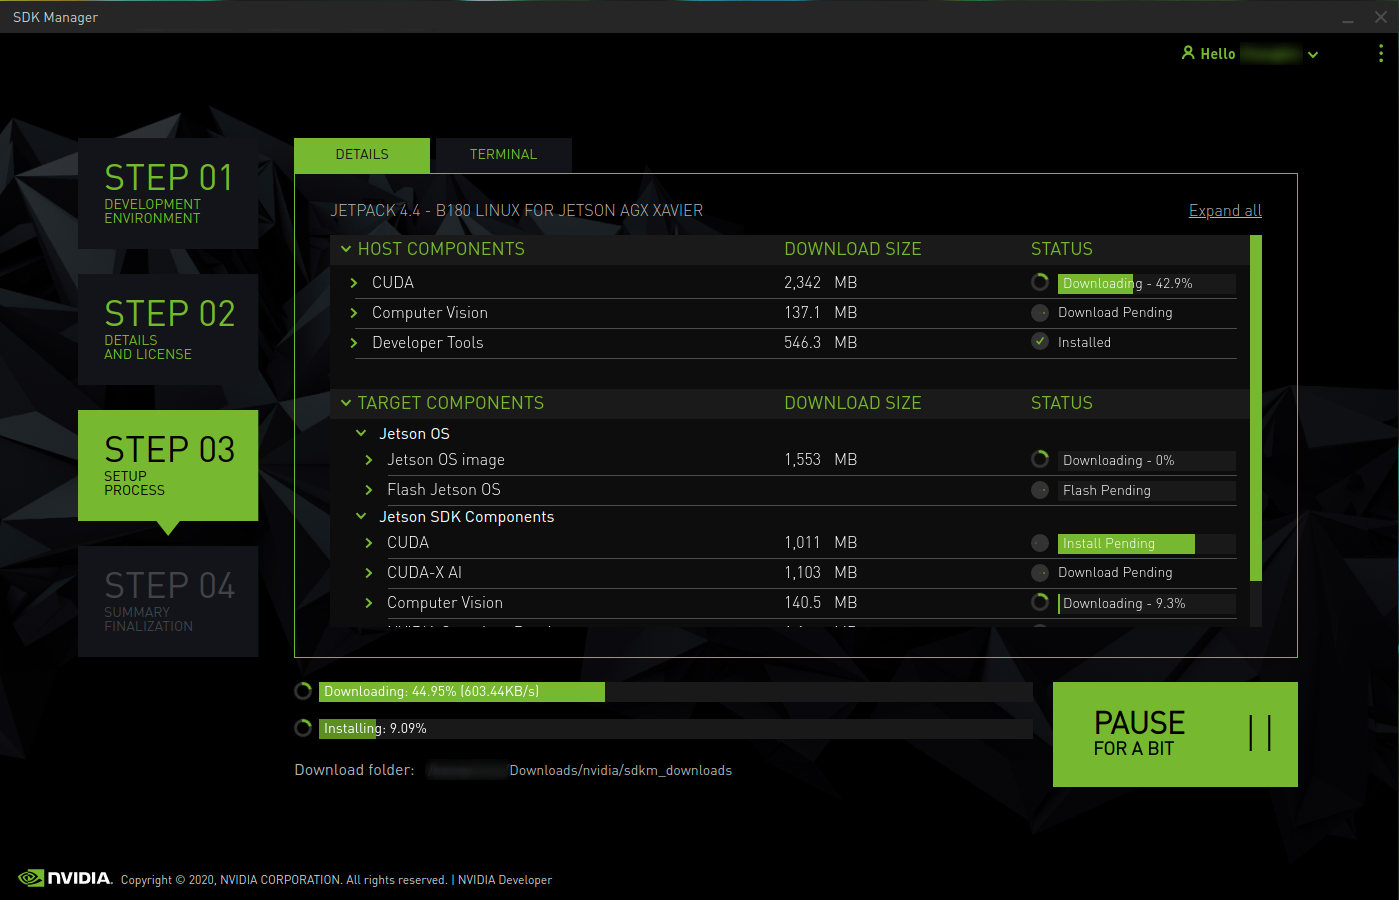
- Download and install NVIDIA SDK Manager from NVIDIA developer site.
- Download and install
zadigdriver here. - Power Off: Ensure the Jetson Orin Nano is completely powered off before beginning.
- Prepare Jumper Wire: Use a female-to-female jumper wire to connect pins 9 and 10 on the Jetson’s header. These are required to initiate USB Force Recovery Mode.
- Power On with Jumper Wire Connected: While the jumper wire is connected, power on the Jetson Orin Nano. The connection between pins 9 and 10 will put the system into Recovery Mode.
- Connect to Host Machine: With the Jetson in Recovery Mode, connect it to a host machine using a USB cable. Open the NVIDIA SDK Manager on the host, which should now recognize the device in recovery mode.
- Proceed with SDK Manager: Follow the prompts in SDK Manager to perform any necessary actions, such as flashing or re-installing the system.
Important
Make sure the jumper wire is connected during the entire process.
Serial
To observe the U-boot console, you need to connect a TTL to USB cable. The connection method is as shown in the following:
Jetson (UART RXD) -> TXD
Jetson (UART TXD) -> RXD
Jetson (GND) -> GND
The baud rate is 115200.
Jetson Nano
Flash Jetson Nano with JetPack
Download SDK Manager here
Boot from SD Card
Set the Jetson Nano enter recovery mode then connect it to the host PC. Flash an Jetson OS, do not check the SDK option.
This should be done on a Ubuntu Host PC:
- Install
dtctool:
> sudo apt-get install device-tree-compiler
- Decompile the dts file (use your path according to the Jetpack 4.x)
> cd ~/nvidia/nvidia_sdk/JetPack_4.6.5_Linux_JETSON_NANO_TARGETS/Linux_for_Tegra/kernel/dtb/
> dtc -I dtb -O dts -o tegra210-p3448-0002-p3449-0000-b00.dts tegra210-p3448-0002-p3449-0000-b00.dtb
- Modify the
tegra210-p3448-0002-p3449-0000-b00.dtsfile, you should modify the codes as below which are marked in red.
sdhci@700b0400 {
   compatible = "nvidia,tegra210-sdhci";
   reg = <0x0 0x700b0400 0x0 0x200>;
   interrupts = <0x0 0x13 0x4>;
   aux-device-name = "sdhci-tegra.2";
   iommus = <0x30 0x1b>;
   nvidia,runtime-pm-type = <0x0>;
   clocks = <0x26 0x45 0x26 0xf3 0x26 0x136 0x26 0xc1>;
   clock-names = "sdmmc", "pll_p", "pll_c4_out2", "sdmmc_legacy_tm";
   resets = <0x26 0x45>;
   reset-names = "sdhci";
   status = "okay"; #change this to okay
   tap-delay = <0x3>;
   trim-delay = <0x3>;
   mmc-ocr-mask = <0x3>;
   max-clk-limit = <0xc28cb00>;
   ddr-clk-limit = <0x2dc6c00>;
   bus-width = <0x4>;
   calib-3v3-offsets = <0x7d>;
   calib-1v8-offsets = <0x7b7b>;
   compad-vref-3v3 = <0x7>;
   compad-vref-1v8 = <0x7>;
   pll_source = "pll_p", "pll_c4_out2";
   ignore-pm-notify;
   cap-mmc-highspeed;
   cap-sd-highspeed;
   nvidia,en-io-trim-volt;
   nvidia,en-periodic-calib;
   cd-inverted;
   wp-inverted;
   pwrdet-support;
   nvidia,min-tap-delay = <0x6a>;
   nvidia,max-tap-delay = <0xb9>;
   pinctrl-names = "sdmmc_schmitt_enable", "sdmmc_schmitt_disable", "sdmmc_clk_schmitt_enable", "sdmmc_clk_schmitt_disable", "sdmmc_drv_code", "sdmmc_default_drv_code", "sdmmc_e_33v_enable", "sdmmc_e_33v_disable";
   pinctrl-0 = <0x8c>;
   pinctrl-1 = <0x8d>;
   pinctrl-2 = <0x8e>;
   pinctrl-3 = <0x8f>;
   pinctrl-4 = <0x90>;
   pinctrl-5 = <0x91>;
   pinctrl-6 = <0x92>;
   pinctrl-7 = <0x93>;
   vqmmc-supply = <0x3b>;
   vmmc-supply = <0x4c>;

   # Add these lines
   cd-gpios = <0x5b 0xc2 0x0>;
   sd-uhs-sdr104;
   sd-uhs-sdr50;
   sd-uhs-sdr25;
   sd-uhs-sdr12;
   # end of added lines
   mmc-ddr-1_8v;

   # Add these two lines
   no-mmc;
   uhs-mask = <0xc>;
   # end of added lines

   linux,phandle = <0xba>;
   phandle = <0xba>;
- Compile the dtb file
> dtc -I dts -O dtb -o tegra210-p3448-0002-p3449-0000-b00.dtb tegra210-p3448-0002-p3449-0000-b00.dts
- Flash the OS to Jetson Nano emmc again with the following command:
> cd ~/nvidia/nvidia_sdk/JetPack_4.6.5_Linux_JETSON_NANO_TARGETS/Linux_for_Tegra/
> sudo ./flash.sh jetson-nano-emmc mmcblk0p1
The flash.sh will flash the os to emmc again.
- When the flash finished, Jetson Nano will reboot shortly. Serial to the Jetson Nano and finish the basic Ubuntu configuration:
> sudo screen /dev/ttyACM0 115200
The following steps should be done on Jetson Nano.
- After second reboot, ssh to Jetson Nano via network. Check the SD card device:
> ls /dev/mmc*
You will see a new device like mmcblk1
- Create partition and format mmcblk1:
> sudo fdisk /dev/mmcblk1
In the fdisk interface:
- Press p to print the current partition table (optional but useful to see existing partitions).
- Press n to create a new partition.
- Choose p for a primary partition.
- Specify the partition number (1 for the first partition if it’s empty).
- Choose the starting and ending sectors, or press Enter to use the default values, which will use all available space.
Write the partition table:
- Press w to write the changes and exit fdisk.
- Format mmcblk1p1
> sudo mkfs.ext4 /dev/mmcblk1p1
- Mount the SD Card:
> sudo mkdir /mnt/sdcard
> sudo mount /dev/mmcblk1p1 /mnt/sdcard
You first need to flash the eMMC normally with SDK manager. This process will install bootloader and firmware to the module.
- Copy Root Filesystem to SD Card
> sudo rsync -axHAWX --numeric-ids --info=progress2 --exclude=/proc / /mnt/sdcard
- Edit fstab file from the SD card to make it mount automatically after reboot:
> sudo nano /mnt/sdcard/etc/fstab
For example:
/dev/mmcblk1p1 / ext4 defaults 0 1
- Modify Boot Sequence
What you need to do is to add a new boot entry, change root to the desired device (e.g. "/dev/mmcblk1p1") and update the default entry to be "microsd". The following is an example of the boot configuration file:
> sudo nano /boot/extlinux/extlinux.conf
For example:
TIMEOUT 30
DEFAULT microsd

MENU TITLE L4T boot options

LABEL microsd
      MENU LABEL microsd kernel
      LINUX /boot/Image
      INITRD /boot/initrd
      APPEND ${cbootargs} quiet root=/dev/mmcblk1p1 rw rootwait rootfstype=ext4 console=ttyS0,115200n8 console=tty0 OS=l4t fbcon=map:0 net.ifnames=0

LABEL primary
      MENU LABEL primary kernel
      LINUX /boot/Image
      INITRD /boot/initrd
      APPEND ${cbootargs} quiet root=/dev/mmcblk0p1 rw rootwait rootfstype=ext4 console=ttyS0,115200n8 console=tty0 OS=l4t fbcon=map:0 net.ifnames=0

# When testing a custom kernel, it is recommended that you create a backup of
# ...
# ...
- Now reboot and verify your rootfilesystem is on the SD card.
> df -h
- Use emmc as a data storage
> sudo mkfs.ext4 /dev/mmcblk0p1
> sudo mkdir /mnt/emmc
> sudo mount /dev/mmcblk0p1 /mnt/emmc
Edit /etc/fstab and add this line:
/dev/mmcblk0p1 /mnt/emmc ext4 defaults 0 2
Install CUDA
Verify the Jetson device is supported by CUDA:
> sudo lshw -C system
Get version:
> dpkg-query --show nvidia-l4t-core
> wget https://developer.download.nvidia.com/compute/cuda/repos/ubuntu1804/sbsa/cuda-ubuntu1804.pin
> sudo mv cuda-ubuntu1804.pin /etc/apt/preferences.d/cuda-repository-pin-600
> wget https://developer.download.nvidia.com/compute/cuda/11.3.1/local_installers/cuda-repo-ubuntu1804-11-3-local_11.3.1-465.19.01-1_arm64.deb
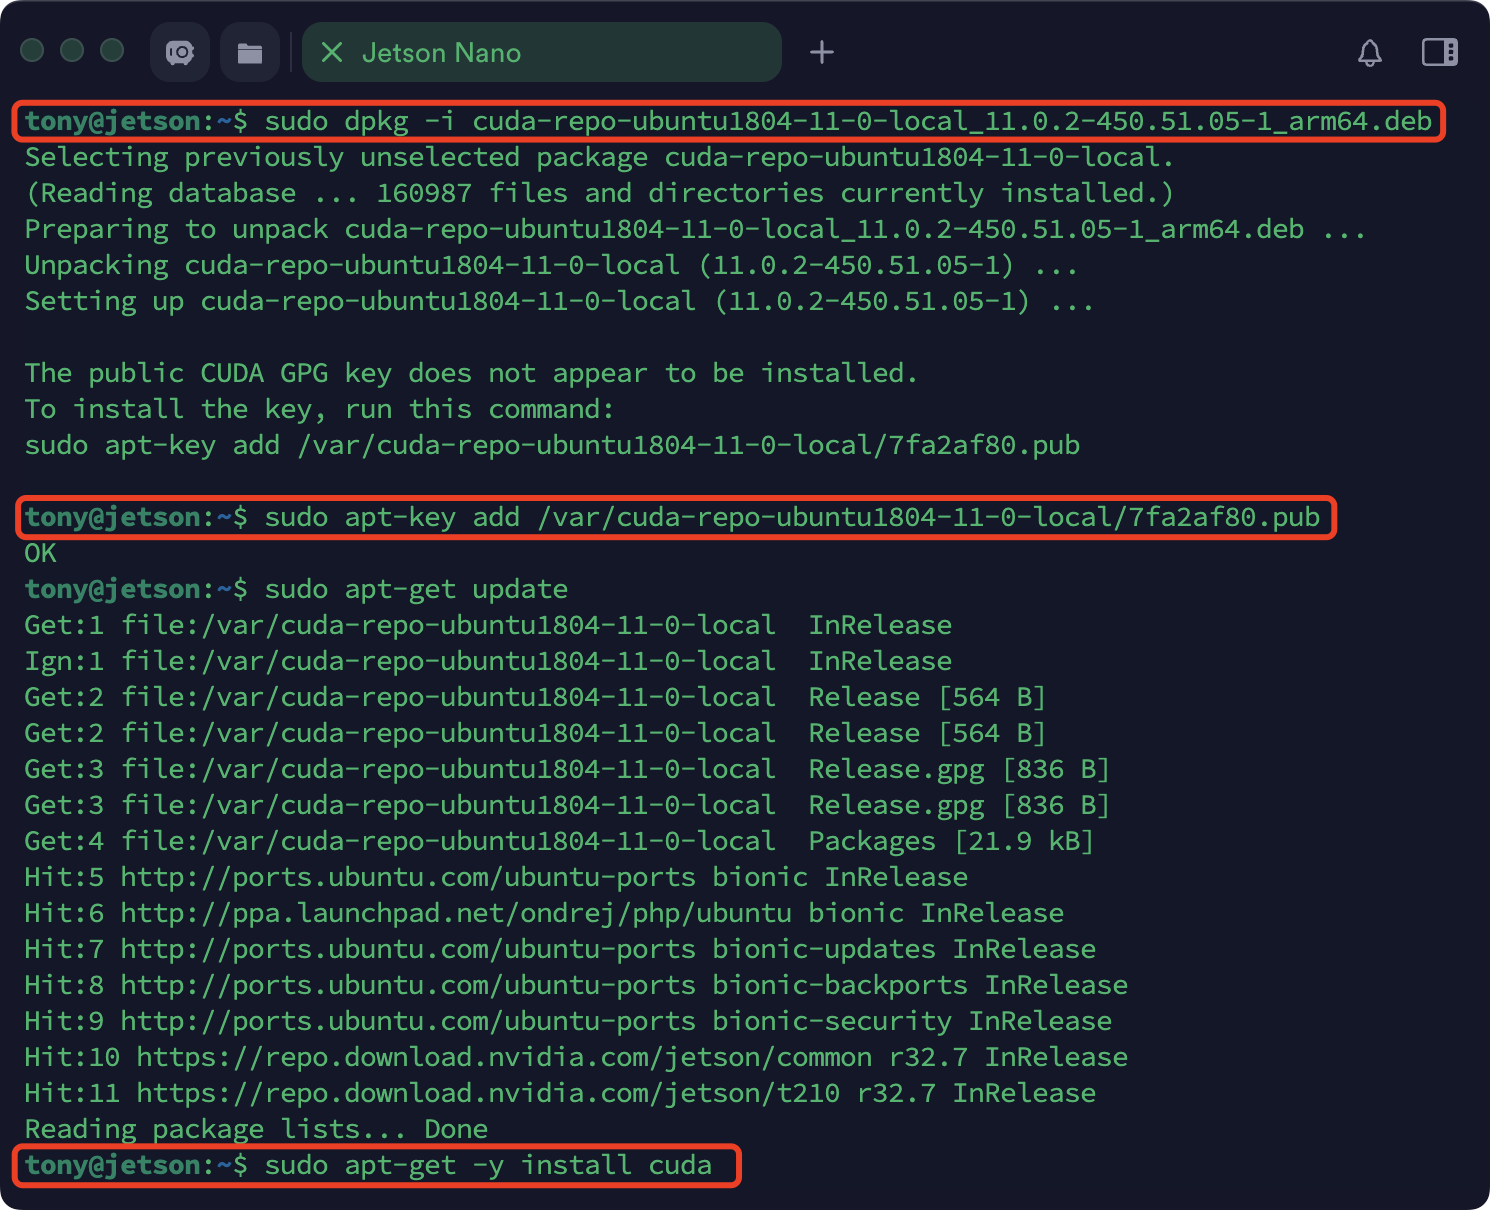
> sudo dpkg -i cuda-repo-ubuntu1804-11-3-local_11.3.1-465.19.01-1_arm64.deb
> sudo apt-key add /var/cuda-repo-ubuntu1804-11-3-local/7fa2af80.pub
> sudo apt-get update
> sudo apt-get -y install cuda
In case you face any dependency issue while executing the last command, run the below fix:
> sudo apt-get -o dpkg::Options::="--force-overwrite" install --fix-broken
Setting up PATH variable:
> cd /usr/local/cuda
> export PATH=/usr/local/cuda-11.3/bin${PATH:+:${PATH}}
Try to run nvcc:
> nvcc --version
nvcc: NVIDIA (R) Cuda compiler driver
Copyright (c) 2005-2021 NVIDIA Corporation
Built on Mon_May__3_19:15:10_PDT_2021
Cuda compilation tools, release 11.3, V11.3.109
Build cuda_11.3.r11.3/compiler.29920130_0
Installing the CH340 USB-to-Serial Driver
- Verify the CH340 USB device is detected
Connect the CH340 device and confirm that it is visible on the USB bus:
$ lsusb | grep -i CH34
- Determine the installed JetPack version:
Check the available JetPack package versions on the system:
$ sudo apt-cache show nvidia-jetpack | grep Version
Example output:
Version: 6.2.1+b38
Version: 6.2+b77
Version: 6.1+b123
From this output, you can confirm that the system corresponds to JetPack 6.2.1.
- Install the prebuilt CH341 driver module
Clone the repository containing prebuilt kernel modules and install the appropriate driver for JetPack 6.2.1:
$ cd ~
$ git clone https://github.com/jetsonhacks/jetson-orin-kernel-builder
$ cd jetson-orin-kernel-builder/prebuilt/jetpck-6.2.1
$ tar -xf usb_serial_ch341.tar.xz
$ cd usb_serial_ch341
$ ./install_module_ch341.sh
- Verify driver installation
After installation completes, unplug and reconnect the CH340 device. Then confirm that the kernel module is loaded:
$ lsmod | grep -i CH34
Expected output:
ch341                  20480  0
usbserial              40960  2 cp210x,ch341
This confirms that the CH341 driver has been successfully attached as a USB serial device.
- Remove brltty (recommended)
If you monitor kernel messages, you may notice that the CH341 interface is claimed by brltty, which is not required for this use case.
To observe USB device activity:
$ sudo dmesg --follow
Remove the unnecessary package:
$ sudo apt purge brltty
- Confirm serial device availability
Finally, verify that the serial device node has been created:
$ ls /dev/ttyUSB0
If present, the CH340 serial device is now ready for use.
Jetson Orin Nano
Storage
NVME SSD
Jetson Orin Nano two M.2 NVME slots are available for storage. One is 2280 and the other is 2230. The system drive should have 256GB at least.
If you want to install another 2230 SSD, follow the steps below:
- Identify the Drive
lsblk
Look for your new drive — it'll likely show as /dev/nvme1n1.
- Partition the drive
sudo fdisk /dev/nvme1n1
Inside fdisk:
- Press
g-> create a new GPT partition table - Press
n-> new partition (accept all defaults for a single full-disk partition) - Press
w-> write and exit
- Format as ext4 with a label
sudo mkfs.ext4 -L "data" /dev/nvme1n1p1
- Create a Mount Point
sudo mkdir -p /data
- Mount it
sudo mount /dev/nvme1n1p1 /data
- Auto-Mount on Boot (fstab)
Get the UUID:
sudo blkid /dev/nvme1n1p1
Edit fstab:
sudo nano /etc/fstab
Add this line at the bottom (replace with your actual UUID):
UUID=xxxxxxxx-xxxx-xxxx-xxxx-xxxxxxxxxxxx /data ext4 defaults,nofail 0 2
The nofail option is important — if the SSD is ever missing, your system will still boot normally.
Test your fstab entry before rebooting:
sudo mount -a
If no errors, you're good. Verify with:
df -h | grep data
Tip: If you want your user to own the drive (instead of root):
sudo chown $USER:$USER /data
Interface
Serial Port
To look up which type of USB to Serial adapter is installed on the system, run:
zcat /proc/config.gz | grep -E "CP210|CH341|FTDI"